Table of Contents
List of Figures
- 3.1. Pipeline Schema
- 7.1. PipeLine Data Flow
- B.1. Schema
List of Tables
This is the Developer documentation of the Procasor project. The book describes used algorithms, implementation details and other issues concerning development of this project.
The book is structured as follows:
In [Chapter 1, Used Tools and Environment] of this book we introduce used tools, which we have employed in the development of the Procasor project.
[Chapter 2, Data Structures] introduces data structures used in Procasor.
In [Chapter 3, Linguistic Tools Application] we describe in detail employed linguistic tools.
Chapters [Chapter 4, Tree Analysis], [Chapter 5, Token Construction], and [Chapter 6, Behavior Specification Derivation] explain algorithms used for use case analysis.
[Chapter 7, Linguistic Tools Integration] is related to [Chapter 3, Linguistic Tools Application] and explains thoroughly the implementation techniques applied to the linguistic tools integration.
In appendices you can find Credits [Appendix C, Credits] and the schema of Procasor data structures.
Note: Authors of this book presume that the reader has already read the User Documentation for the Procasor project.
Table of Contents
The Procasor project is written in the Java 2 Standard Edition [7] programming language. For the development, the Procasor team uses the Eclipse IDE.
In addition to the standard libraries supplied with the Java platform, we use the following extending libraries.
To provide the graphical user interface, we use the Swing Project [10] which is included in the J2SE.
- JARs
sax.jar,dom.jar,jaxb-api.jar,jaxb-impl.jar,jaxb-libs.jar,jaxb-xjc.jar,jaxp-api.jar,relaxngDatatype.jar,xalan.jar,namespace.jar,jax-qname.jar,xsdlib.jar- Standards
JAXB 1.0.4
- Website
- JARs
jaxp-api.jar,dom.jar,sax.jar,xercesImpl.jar,xalan.jar- Standards
JAXP 1.3, DOM Level 3, SAX 2.0.1, XML 1.1, Namespaces in XML 1.1 (including XML Qualified Name and Namespace Context), XSLT 1.0, XPath 1.0, XML Schema, XInclude
- Websites
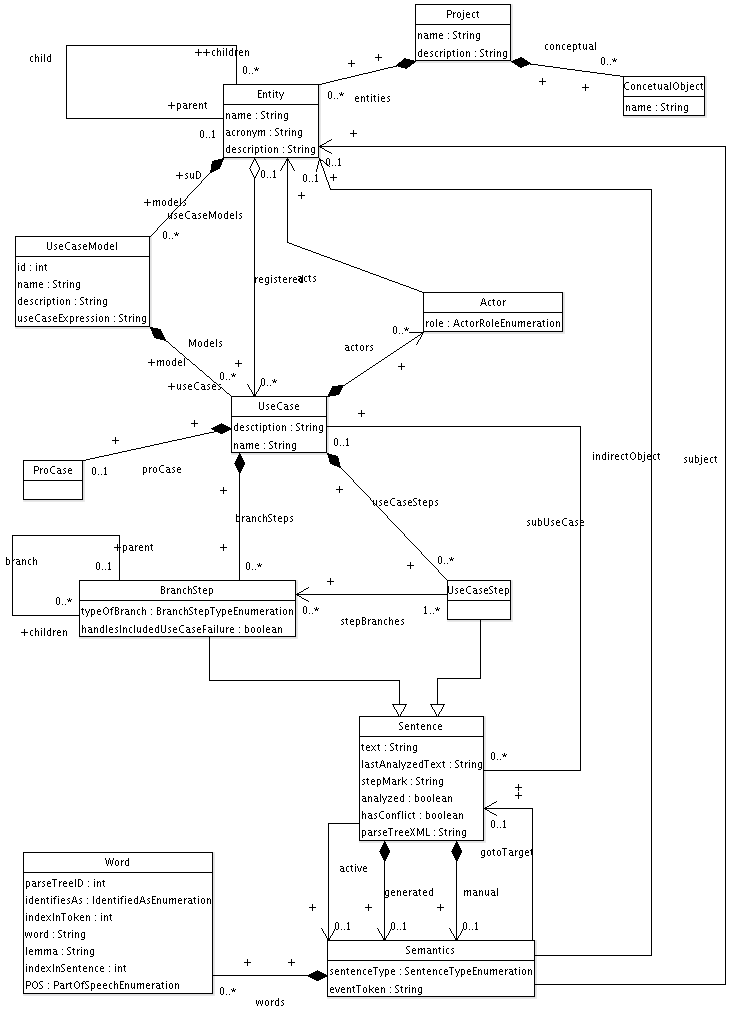
The entire internal data structures of the Procasor program are managed by the JAXB. The structures refer to the structure of the set of use cases which are written for some project. Every project contains entities, which are organised in a hierarchical structure. Each entity contains one ore more use case models, these models contain use cases. The Use case has a list of sentences, a sentence may be a use case step or a branch step. Use case steps and branch step create a parent-child hierarchy. For each sentence there is the generated semantics and the manual semantics, one of these semantics is marked as the active semantics. Each semantics has the list of words which were used in the sentence.
For better insight into the data structures in the Procasor program, see the UML class diagram schema [Figure B.1, “Schema”]. Methods of these core classes only provide the access to the contained data. Almost each class has its own static helper class which provides advanced functionality.
The following list of classes with their attributes is a guide for reading the class diagram schema [Figure B.1, “Schema”].
Projectname- the name of the projectdescription- textual description
Entityname- the name of the entitydescription- textual descriptionacronym- the acronym which is used to identify the entity
Modelname- the name of the modeldescription- textual descriptionuseCaseExpression- the use case expressions
Use casename- the name of the use casedescription- textual descriptionacronym- the acronym which is used to identify the use case in the use case expressions
Sentencetext- the text of the sentencelastAnalyzedText- the last analysed version of this sentencestepMark- the mark of the stephasConflict- this indicates if there is a conflict between the manual and generated semanticsparseTreeXML- the parse tree of the sentence in the XML notation
Use case stepBranch steptypeOfBranch- this indicates whether this branch is an extension or a variationhandlesIncludedUseCaseFailure- indicates whether this branch serves as the abort handler for an included use case
SemanticssentenceType- the type of the actioneventToken- the label of the token which was generated from the semantics
WordparseTreeId- the id in the parse treeidentifiedAs- the identified role of the word in the sentenceindexInToken- index of the word in the tokenword- the word itselflemma- the lemma of the wordindexInSentence- the index in the sentencePOS- the part of speech tag
Actorrole- the role of the entity in the use case
ConceptualObjectname- the name of the conceptual object
Table of Contents
In this chapter we discuss the challenges concerning application of linguistic tools. At first we provide a detailed description of each linguistic tool employed in Procasor. Thereafter we describe the process of the parse tree generation, we also provide the schema of linguistic tools interconnection. At last we focus on transformation of the parse tree into the XML form.
For detailed description of the integration of linguistic tools into Procasor, please see [Chapter 7, Linguistic Tools Integration].
This section describes the linguistic tools used in Procasor in deeper detail. We focus on each tool individually, introducing its tasks and abilities.
Tokenizer is the first tool used by Procasor. Tokenizer was developed for tokenization of English texts at the University of Sussex [3], its task is to pre-process the input sentence. This simple Perl scrip formats the input sentence into the form which can be processed by the following tools.
Tokenizer extracts tokens (substrings) from a given string (sentence). The tokens are separated by one delimiter (space character), other white spaces are ignored.
The sentences are tokenized according to the Penn Treebank conventions [1], e.g., "The stock didn't rise $5." is transformed to "The stock didn ' t rise $ 5" . The Tokenizer separates contractions into multiple tokens, splits the word "didn't" into three tokens "didn", "'" and "t". In general, every incoherent string is separated into stand-alone tokens.
When working with the Tokenizer we have to be careful about the sentences which are passed to its input. The empty sentences are problematic, in particular. The Tokenizer ignores empty sentences and continues with waiting for a non-empty input, which in consequence could cause the deadlock of the Parser. We prevent this deadlock by filtering the input.
POS tagging is a fundamental procedure that prepares the input sentence for the Collins Parser. Because the parser requires to receive sentences with POS-tags assigned, we use the MXPost Tagger [4].
The tool assigns an appropriate POS-tag to each word of the sentence. The tagger is based on a statistical model which is trained using a corpus annotated with POS-tags and assigns them to previously unseen text with state-of-the-art accuracy (96.6%).
The input sentences must be tokenized according to the Penn Treebank conventions. To comply with this requirement we pre-process the sentences by the Tokenizer tool.
Output of the process is the sentence with POS-tags assigned (and appended) to every word. Before passing the sentence to the Collins parser we have to append the information determining count of words in the sentence (see [the section called “Output Format”] for more details about the Collins parser input format).
The Collins parser also requires additional modifications of the output data. These modifications are necessary, because the bracket characters are used as special characters in the Collins parser, for this reason we have to substitute every occurrence of '(' and ')' characters by a special string, -LRB- and -RRB-, respectively.
For example, the sentence "The seller ( the buyer ) submits item description ." should be changed to "The seller -LRB- the buyer -RRB- submits item description ." The character '(' is substituted by -LRB- and ')' is substituted by -RRB-.
MXPost Tagger also provides statistical information in form of messages printed to its error output. The initialization process of the tagger prints messages to the error output as well, therefore we can easily check the progress of initialization.
The Collins parser [5] is used for constructing a parse tree from the input sentence. Before parsing that sentence, we pre-process it by the Tokenizer and the MXPost Tagger in order to gather the information, which the Collins parser requires for successful parsing.
Note: The parser requires a huge amount of memory, we recommend to have at least 200 MB of free memory to run the parser.
The input sentence must be tagged - every word in the sentence is followed by its POS-tag, each token (words and POS-tags) in the sentence is separated by a single space character. For tagging the sentence we use the MXPost Tagger. The Collins parser requires us to prepend the sentence with a prefix specifying the number of words in the sentence, too.
The schema of Input format is "N word_1 tag_1 ... word_n tag_n", where N is the number of words in the sentence.
The following string is an example of a correct input for the Collins parser: "5 Seller NNP submits VBZ item NN description NN . ."
The output is the parse tree of the processed sentence. The tree is stored in a special format which uses brackets for denoting the nodes, leaves and information contained in these components. For example:
(TOP~submits~1~1 (S~submits~2~2 (NPB~Seller~1~1 Seller/NNP ) (VP~submits~2~1 submits/VBZ (NPB~description~2~2 item/NN description/NN ./PUNC. ) ) ) )
is the parse tree for the sentence: "Seller submits item description", see also Parse Tree in User documentation. For further details about this output format, please see the Collins parser documentation.
Besides the parse tree, the Collins parser generates the statistical information complementing the parse tree construction. All this information is printed on to the standard output, we have to filter the output data in order to obtain the parse tree.
When Collins parser is being initialized, messages describing the initialization process are printed to the error output.
The Morp-a tool [6] is the morphological tool used for obtaining the lemma of a word. We use this tool to complete the information about words in the sentence processed by the Collins parser. The parse tree does not implicitly contain the lemma form of words in the parse tree and because these forms are required in linguistic analysis employed in Procasor, we complete this information for every word in the parse tree with the assistance of Morph-a tool.
The Morph-a tool differs from the other tools used in the Procasor in the nature of input data. The other three tools process whole sentences, the Morph-a tool processes single words of the sentence.
E.g., the output format of the Morp-a tool for word "submits" is "submit+s", where the token "submit" is the lemma of the input word.
This chapter discusses the cooperation of linguistic tools in Procasor. A schema that illustrates communication between employed tools is provided, too.
Linguistic tools described in the previous chapter form a chain of actions applied to the input sentence in order to acquire the parse tree. In the [Figure 3.1, “Pipeline Schema”] we can see the sequence of these tools used on the input sentence. The sentence is processed by the linguistic tools step-by-step with one exception - the Morph-a tool. The Morph-a tool is called for every word in the sentence.
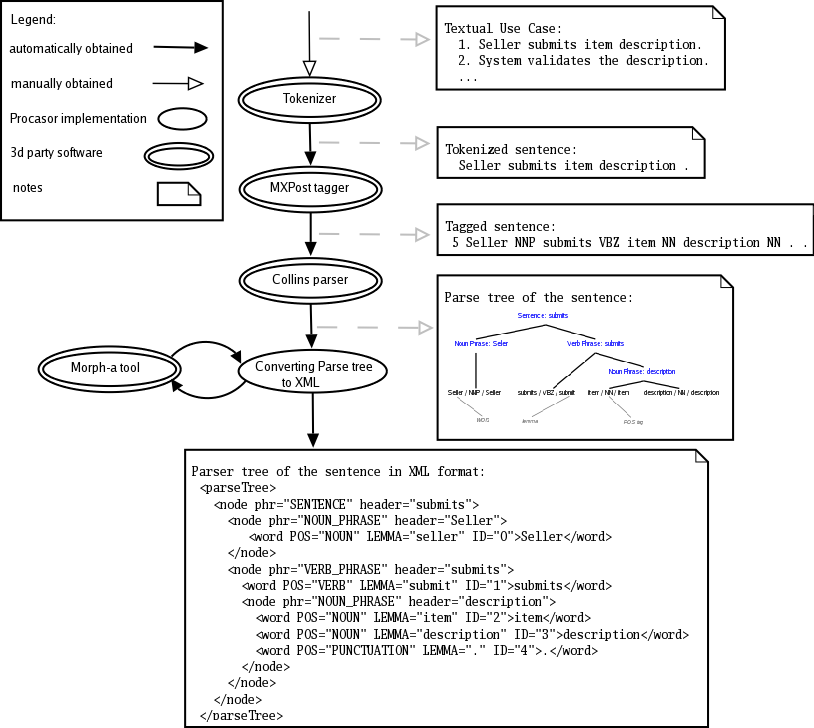
The parse tree acquired from the Collins parser is saved in a special format using brackets. Accessing information contained in parse tree, which is stored in the "bracket" format is not very effective, therefore we decided to transform the parse tree into the XML.
The conversion to the XML is the last step of linguistic tools application. When acquiring the parse tree, we employ the Morph-a tool for obtaining the lemma for each word of the parsed sentence. Therefore, the word's lemma is contained in the XML format of the parse tree as well.
Table of Contents
Inputs of tree analysis are:
The parse tree of the sentence, obtained by the linguistic tools and transformed to XML.
Use case information, including actor names (used for detecting subject and indirect object) and other steps (used to find targets of goto special actions).
Project information, including conceptual object names.
Semantic information is the desired result of parse tree analysis. It includes:
- Step type
A step may be an operation request, either received or sent by the SuD, or an internal action of SuD. In addition, a step may specify a special action.
- Subject
This is the entity performing the action.
- Indirect object
This is the entity receiving a request from SuD (applicable only for request sending operation).
- Principal verb
Describes the action.
- Representative (or direct) object
Describes the data being passed.
We have chosen to use XML to store parse trees. In particular, this allows us to use XPath queries to find important phrases and words of the parse tree. For simple manipulation with parse trees, we employ DOM as well.
XML related functionality comes from JAXP Reference Implementation, namely packages
javax.xml.parsers,
javax.xml.xpath and
org.w3c.dom.
Note
In the program, some XPath queries are divided into two or more successive queries. The reason is, it is often useful to find a phrase in one step and find relevant words in the following step, since the phrase may be used afterwards. In this document, however, dividing the queries to steps would only be confusing, so the steps are merged into one XPath query.
For a common step (one that does not specify a special action) the semantic information is derived as follows.
First, we detect the subject. An SVDPI sentence should contain a noun phrase and a verb phrase. This main noun phrase is the subject. We use following XPath query to get all nouns in this phrase:
parseTree/node[@phr="SENTENCE"]/node[@phr="NOUN_PHRASE"]//word[@POS="NOUN"]
As the subject has to be an entity, we match these nouns with names of actors involved in this use case. Moreover, term “System” may refer to SuD and term “User” refers to the primary actor of the use case.
If subject is not found, we try to detect a special action. If the step is not even a special action, the tree analysis fails. Possible reasons are, that the sentence was either badly written, or that the linguistic tools have failed.
If SuD is the subject, we check whether an actor is the indirect object of the sentence. We query for indirect object candidates with
parseTree/node[@phr="SENTENCE"]/node[@phr="VERB_PHRASE"][1]//node[@phr="NOUN_PHRASE"]
For every candidate, all included nouns are gathered and matched with actor names. We do not allow the indirect object to be in possessive case.
If SuD is the subject and indirect object is found, the step describes a request sent by SuD to the indirect object actor. If indirect object is not found, the step is an internal action. If an actor is the subject, the step describes receiving a request from this actor (from the view of SuD).
The main verb is the first full verb (verb that carries the meaning) in the main verb phrase. For this purpose, we collect all verbs in the main phrase using
parseTree//node[@phr="VERB_PHRASE"]//word[@POS="VERB"]
If the first verb is a padding verb (one of “ask”, “be”, “decide to” etc.) and there’s another verb following it, we use the second verb. Otherwise, the first verb is recognized as the principal verb.
Excluding phrases used for subject and indirect object, the first basic noun phrase subordinate to the main verb phrase is identified as the indirect object. All nouns from this phrase are collected and matched with the conceptual object list. If a name of some conceptual object is matched, only the matched words are used as the representative object. Otherwise, all nouns from this phrase are used.
When we try to match words of a phrase with the name of an entity or a conceptual object, we need to take the name's length into account. Consider a model with entities "Marketplace" and "Marketplace Information System" and a sentence "User contacts the marketplace information system.". Here, Marketplace Information System is the indirect object, but Marketplace would meet the matching requirements as well. To avoid the risk of misinterpretation, we need to start the matching from the longest names.
Terminate action may terminate the use case or only the branch. It may also be an aborting action, signaling a failure. For a terminate action to be identified, verb must come from a list of triggering words (“end”, “terminate” or “abort”, the last identifying an aborting action) and subject must be one of a few keywords (“Use case”, “Extension” etc.) or the sentence must have no subject. Same XPath queries as for regular steps are used to find the subject and main verb.
A sentence containing a goto action mostly has no subject, so we do not even try to
identify it. Instead, we search the sentence for a verb from a keyword list (“resume”,
“continue” etc.) and for a step label. A word is identified as a step label if it starts
and ends with a digit. Unfortunately, linguistic tools tend to parse such sentence
incorrectly in most cases, deciding that the verb (e.g. “resume”) is a noun. XPath query
for the step label would be quite complicated, if it exists at all. Therefore, we only
get all words of this sentence using DOM method
getElementsByTagName("word") and search these words for described
patterns.
When analysing a condition, we check for every word separately, if it is important and should be used as a part of the condition's token. The word is marked as not important, if it's one of the following:
a preposition
punctuation
a "to"
determiner "any" or "the"
a padding verb
Otherwise, the word is considered important and will be used for creating token of the condition.
Table of Contents
The Tokenizer is the object which manages the generating process and the whole work with tokens. The purpose of the Tokenizer is to generate the selected token, which is used for generating Pro-cases. The Tokenizer is not the same Tokenizer, which is used in linguistic tools, it only has the same name.
Tokenizer has two variables which can be set in the graphical user interface in properties window. More information about properties window can be found in User documentation in the User Interface chapter. The first variable is the number of tokens displayed in the Tokenizer Tab. The second variable is the percents of similarity to perform learning token process. You can read more about token learning in the section called “Learned Token”.
The action label is a sequence of characters and symbols representing the action described in the use case sentence. Usually, action labels are about 3 to 30 characters long and should be self-explaining. By convention, the first character of the token is the symbol which indicates the type of the action. Then, the subject or indirect object or rather its acronym follows. The action label ends with few concatenated words that explain the action. And these words we call token. These words could be explained as name of the method, invoked on an object.
There are four types of action. First two are the most common, request sending and receiving. The third action is an internal action, which represents the system under design's internal change of state. The fourth action type is a special action which represents a change in the flow of control in the use case.
Each entity in the project has its acronym. This acronym should be unique and starts with a letter followed by several letters or digits. This acronym is only used when the type of action is sending or receiving a request. Otherwise, entity acronym is not used.
After entity acronym a dot follows to separate the entity acronym from the token. Each of these words should start with uppercase letter followed all letters lowercase. This rule should be applied on all words except the first one, which is whole lowercase. In fact, this rule exactly matches the convention of naming methods in many programming languages.
There are types of actions which are special and have the special token.
As said before, tokens are used for describing an action and are used as basic stones for building Pro-cases. If the use case describes communication of two entities, corresponding tokens should be found in use cases describing both entities.
For example, client as SuD calls getOrangesInStore() method on the store system. In this case, there should be another use case where the store system is the SuD, which describes the communication between the client and the store from the opposite view. And in this use case, the client should call getOrangesInStore() method on the SuD.
In the whole project should be some consistency of selected tokens. In fact, each token should be used more than one time, except the special and internal actions. This becomes a bit tricky if these tokens are built from sentences written by the user in use cases, since sentences are usually not identical even when they describe identical action.
Tokenizer is the last step of process which is applied on sentence when the use case's step is analysed. During linguistic tools analysis and parse tree analysis the word's POS-tag (part of speech tag), index in the sentence and the mark where is the role of the word in the sentence are determined. The type of the action of the analysed sentence is supplied, too.
First, a simple token is generated, then the Tokenizer attempts to generate the learned token and if the generating process was successful, the learned token is used as the selected token. If the user is not satisfied with the selected token, there are three ways of changing the token: merging the token, mixing the token or writing the token by hand. All these way of changing the selected token except the token written by hand generate the full-value token in the meaning, that the selected token consists of words which are in the sentence. If the token is written by hand then the Tokenizer does not have information which word in the sentence were used in the selected token and therefore it can not be used for learning token generating process. This token will be called the written by hand token.
The simple token is generated from words which were marked as representative object by the Tree analysis. They are put together by a rule, that first comes a verb and then follows other words in the order in which they are in the sentence. Words are put together in lemma, only if the type of action is condition, then the words are in original form. In most cases this is the best way of generating the token. If the sentence makes sense, then so does the simple token. This is the natural way of how human would use the words in the sentence to generate the token.
The learned token is useful for the case when the user was unsatisfied with the generated token and mixed his own token. In this case, the order and whether the words were used in the selected token may differ from the simple token. When the user writes the same or similar sentence to the mixed one in the project, then the user may expect to get the token made of words in the changed order.
The whole process of generating the learning token consist of four steps.
The first step is picking up the most similar token from all tokens used in the project. This is done by the same algorithm as in [the section called “Merging the Tokens”]. If the picked token is similar enough, than the process continues with the next step, otherwise no learned token is generated. The rate of the similarity can be set by the user in preferences (percents of similarity to perform the token learning process). This token and its sentence will be called the chosen sentence and the chosen token further in this section. The sentence and token on which the token learning process is applied will be called the given sentence or the given token.
The second step is learning the structure of the chosen token and applying this structure to the given sentence. First of all, the words which are equal are selected. There should be some equal words, because the tokens are similar. The words will be used in the given token on same position in the chosen token.
In the third step we select the words from the given sentence which have the same POS-tag as a not assigned word in the chosen sentence which were used in the chosen token. If there are more words with the same POS-tag in the given sentence which were not used in the given token, we pick the one, that has the most similar length.
The fourth step is applied on the rest of the words in the chosen sentence which still have no pair in the given sentence and were used in the chosen token. Each two pairs determinate a boarder in which the another word in the chosen sentence should have a pair word. If there are more words, we pick such word, which has the most similar length.
The next and final step is checking, whether the learned token generating process was successful or not. We compute the number of the words from the chosen sentence which have a pair in the given sentence. Then we compute the number of the words in the chosen sentence which were used in the chosen token. If the quotient of these numbers converted to percents is equal to or greater than the user variable (percents of similarity to perform token learning), then the given token generated by this process is used.
All the tokens used in the project are stored together in the Token storage object. Token storage contains the map of the selected tokens and the list of sentences where the token was used. Token storage is used for Token merging and for the Token manager. The list of the sentences is ordered so that the sentence on the first place contains all the words which were used in the selected token. If the token is a written by hand token, then no ordering is demanded. This ordering is very useful for the learning token generating process. A situation may come, that there are more sentences merged together and the first sentence which generated the token is removed from the project. Then the Token storage attempts to find the next sentence which contains all the words from which the selected token consists and put this sentence on the first place in the list. If a sentence which has all the words used for generating the selected token is not present, then all sentences are marked as a written by hand token.
The user may be dissatisfied with the generated token. In that case the user has three possibilities to change the selected token. The first way is to merge the token with the selected token which was already used in the project. The second way is to mix the words in the sentence to build the selected token. The last way of changing the token is to write the token by hand.
In the case when selected token is not already used in the project and the action, which represents the sentence has already its token in the project. Then the user can use the action's token instead of the selected token. The user can choose the token to merge with in three ways.
The user can choose the token from the list of most similar tokens or from the list of tokens from opposite use cases. You can find more about the opposite use cases in [the section called “Opposite Use Cases”]. And there is the last way of choosing the token to merge with and it is to pick the token from the list of all tokens in the project. More information about these lists and the graphical interface you will find in User documentation in the section Graphical User Interface.
The algorithm of finding the most similar token is used with merging and with token learning. The algorithm counts the length of the common subsequence of two words. The subsequence must be successive. These lengths are multiplied together and product is resulted. This algorithm does not impeach the order. Therefore, if the token consists of the same words in different order, then this algorithm results in finding these words as very similar.
This way of changing the selected token is useful when the user is not satisfied with the order of the words used in the selected token or if the user is not satisfied which words were used and which were not. The user can pick the words which were in sentence and were not marked as subject or indirect object.
The Token manager gives the user the opportunity to manage all tokens in the project. This is helpful, when the user has finished writing the use cases and wants to revise the selected tokens. The user has the overview of the selected tokens in the whole project and can merge these tokens together. You can read more information about the Token manager and the graphical interface in User documentation in section Graphical User Interface.
The opposite use cases to the given use case step are the use cases which refer to the entity which was used as the subject or as the indirect object. To be more precise, the use case to which we are finding the opposite use cases refers to entity, in this section we call this entity as the given entity. The opposite use cases can only be found for the use cases which have the subject or the indirect object, that means the type of action of the sentence is request receiving or sending. We call the entity which is the indirect object or the subject of the given use case the chosen entity.
These entities in the parent-child hierarchical structure may have common parent or the top parents of this entities are at the top level as the roots. All the use cases of the unities on the parents line from both entities, the given and the chosen entity, are signed as the opposite use cases and their tokens are used for generating the list of opposite use cases tokens.
Table of Contents
For the finite state machine (FSM) storage, creation and transformation, we use the following data structures.
A Machine stores finite state machine's states and transitions. Machines can be
nested one in another, to support this, the machine stores information about its parent machine, its
abort handler, and may contain another machines. In addition to internal states, a machine has the
initial state and the final state.
A State is a state in the finite state machine. Every state has a unique name,
that is used when the state machine is exported to UML.
The Connectable interface is implemented by classes, that can be
connected with transitions. A connectable object must remember the information about incoming and
outgoing transitions. This interface is implemented by the state class and the machine class, which
allows us to perform nesting one machine into another with grace.
A Transition is an oriented connection between two connectable objects. It
contains the information about its start and end state and an expression. This expression represents the
event performed when using the transition to move from its start state to its end state.
An Expression interface stores a general expressions. Various classes
representing Pro-case operations (atomic, sequence, alternative and so on) implement this interface.
During the Pro-case derivation process, simple expressions are combined into complex ones.
Creation of the finite state machine is performed by the MachineBuilder class.
States and transitions for the main success scenario are added first (described in detail in [the section called “Adding States and Transitions for a Step”]). Second, branch steps are processed, this processing takes several rounds. A branch is only processed, when its parent (the step which the branch is connected to) has already been processed. When steps are added for the branch, it will not be processed in following rounds. We remember in which round the branch was processed, this information is useful later, when computing layout for the UML State Machine.
Processing a branch step includes determining the branch's parent step(s). The conditions first step will be connected to its parent step(s) with a transition containing an atomic transition with the condition token. For variations, branches are connected to the parent step's post-state, for extensions, parent's pre-state is used. After that, states and transitions for each step of the branch are added. Finally, we create a void (or lambda) transition from the branch's final step, to the step following the extended step. If a branch has more parent steps, multiple copies of states and conditions are created, each connected to one of the parent steps.
For the step, two states are created. The first one is called a pre-state, representing the moment before event is performed. The other one is called a post-state and represents the moment after the event is performed. If the action type is including a use case, a new machine is created and included in the main machine, instead of creating the post- and pre- states.
A transition is created to connect the newly created pre-state to the post-state of the previous step. Usually, a void expression is used. For the first step of a branch, we use an atomic expression that contains the token of the condition, that triggers the branch.
Other operations are driven by the action type of the added step.
For internal actions and request sending and receiving actions, we create a transition from the pre-state to the post-state, containing an atomic expression with the steps token.
For termination actions and goto, we create a lambda transition from this states pre-state to the according state. This is the machine's final state for use case terminating action; the following step's pre-state for the branch terminating actions, or the pre-state of the goto action target.
For a use case including action, we create a new machine and include it in the main machine (as mentioned above). In addition, we search extensions of this step for an extension marked as "Handles included use case failure". If such extension is located, the pre-state of its first step is marked as the abort handler for the newly created machine. After this, we add the new machines states and transitions using this very algorithm.
For an abort action, we create a lambda transition to the final state of the current finite state machine. If this machine is included in some other machine, further tasks are performed. If the FSM has an abort handler set, we created a transition from the machine to the abort handler state. In the expression of this transition, we repeat the token of the condition, that triggered the branch, that ended with the abort action. If the abort handler is not set, we create a transition (with the condition token) from the machine, to the final state of the parent machine. We repeat this, until we encounter an abort handler, or until we reach the topmost FSM.
Before we proceed to the FSM creation, we check whether semantic information is present and valid for
every step of the use case. This check is implemented in the FitnessChecker
class.
When performing [the section called “Adding States and Transitions for a Step”], some of the states we would like to connect may not exists. For this reason, we don't create the transitions immediately, but we collect them in a task list. Having added all states, we add all transitions stored in this task list. The same applies to the included machines, where the abort handler state does not exist by the time we process the use case including step.
For access to the states of a machine by step mark, we maintain an index during the FSM creation process.
To derive a Pro-case from the generated finite state machine, we employ the algorithm for deriving an equivalent regular expression. During this algorithm the number of states and transitions is reduced and the simple expressions are combined into complex ones. In the end, this algorithm reduces the finite state machine to an equivalent state machine that only has the initial and final state, connected with a single transition. Expression of this transition is the Pro-case of the use case.
First, we use this very algorithm to reduce all included machines. After this reduction, we redirect all transitions that ended at the reduced machine, to the initial step of the machine. Similarly, we change all transitions starting at the reduced machine to start at its final state. After that, we move the machines initial and final steps to the parent machine (They will become common states in there).
Next step is removing unreachable states from the machine.
Then, the actual reduction algorithm takes part. The algorithm iterates, until the reduction is complete. In every iteration, the algorithm:
Eliminates loopbacks. Loopbacks are transitions starting and ending in the same state. During elimination, repetition (*) is applied on the expression of the loopback. This repeated expression is then prefixed to every transition starting in this state.
Eliminates parallel transitions. Transitions that share the starting and ending states are transformed into one transition. Alternative(+) is applied on the individual expressions to acquire the combined expression.
Eliminates a state. A state is chosen and eliminated. We create a new transition for each pair of incoming and outgoing transitions. We combine them using the sequencing (;) operator and use this combined expression for a new transition that takes the start from the transition that was incoming in the eliminated state. The end is taken from the transition outgoing from the eliminated state. For choosing the best candidate for elimination, we use a simple measure. We multiply the numbers of transitions incoming into and outgoing out of the state. The lesser the result, the better the candidate.
For the generation of model Pro-cases from use case expressions, we have implemented a simple parser in
the ModelExpressionTransformer class.
When the parser encounters a Pro-case operator or bracket, it only applies defined formatting. When it encounters an alphanumeric sequence, it tries to find a use case with acronym set to this sequence. If successful, the acronym is expanded into the use cases Pro-case.
Creating UML documents is implemented in the UMLWriter class.
We already have most information that we need for the UML state machine export. We have created the machine with its steps and transitions using the finite state machine creation algorithm. If there are included machines, we perform a simple transformation. We move the states of the included machine to the parent machine and modify the expressions that were incoming into or outgoing out of the included machine, so that they end or start in the included machine's initial or final state. By now, we only need to compute the states position in the diagram.
We start with the initial state of the machine. Each time we position the state itself and then process all branches connected to it recursively. We position the next state below the area filled with the previous step's branches and so on.
For every state, we find another state, that controls its position. We identify it as the step with the lowest level of branching among the state's predecessors. Mostly, this controlling state is the pre-state for post-states, the post-state of the previous step for pre-states, and the parent step's post- or pre-state for the first steps of extensions/variations
Finally, we save this information in the UML format. The format is vast and complicated, but saving into it merely means filling some templates with computed values.
Table of Contents
This chapter describes implementation solutions used for the linguistic tools integration. We introduce the PipeLine system, which is the key solution for the integration of linguistic tools. Another important part of this chapter describes behaviour of the PipeLine in error scenarios. We also mention the modifications to the linguistic tools, which were necessary for successful integration of these tools into the Procasor.
Linguistic tools employed in Procasor are not integrated inside the program. Procasor only creates system processes - one for each linguistic tool, linguistic tools run in these processes and Procasor communicates with them using a system of pipes. The whole system consisting of processes, threads and pipes connecting processes into one chain is called the PipeLine. At Figure 7.1, “PipeLine Data Flow” you can see the schema of the PipeLine.

The main job of the PipeLine is to communicate with linguistic processes and to pass the output of one system process to following one. The communication between members of the PipeLine is provided by a "system" of pipes, which are represented by red arrows in the schema. In following sections, we describe objects of the PipeLine and their roles in this subsystem in detail.
The Parser class manages the process of linguistic tools application. The Parser creates the PipeLine and passes the sentences which the user wants to process to the PipeLine. Through this class, the parsed sentence is passed back to the user as well. Another important task is to check whether the processes in PipeLine run without errors and that the PipeLine has not been broken. When Procasor is being closed, the Parser is responsible for terminating all linguistic tools.
The first step taken by the Parser is the PipeLine initialization, the Parser creates all members of the PipeLine (instances of the ParserTool) and connects them using a system of pipes into the proper sequence. After the initialization, Parser maintains the function of Parsing process by passing the input to the PipeLine and returning the result to the user. Parser also receives messages (collected by the InfoQueue) about internal events in the PipeLine and evaluates them.
The ParserTool is instantiated for every linguistic tool. Its main task is to communicate with the system process where the linguistic tool is running. The ParserTool also immediately checks all output data of the linguistic tool. Every output is filtered and checked by regular expressions in order to catch error messages from the linguistic process or wrong output formats. Before passing the result to the following linguistic process (represented by another instance of ParserTool) we can modify the output data to a format required by following linguistic tool.
Input data of the ParserTool are immediately sent to its linguistic process, standard and error output of the linguistic process are checked and passed to the following ParserTool. Error checking is provided by regular expressions, which control the format of output data, see the section called “Error Detection”.
The process of the parse tree generation is composed of many steps, which are hidden to the Parser. To inform the Parser about the current state of the PipeLine, we introduce InfoQueue. Every ParserTool sends messages describing state of particular ParserTool into the InfoQueue. The Parser decodes this messages and finds out whether the linguistic processes run correctly. Each ParserTool has to inform the Parser by using the InfoQueue when an error occurs, the Parser evaluates these messages and determines if it is necessary to restart the PipeLine, which means restarting all linguistic processes.
The Parser receives the messages about the state of the parse tree construction from the InfoQueue, too. These messages are interpreted and the user is notified of the state of the linguistic process by short messages in the Parser console. Messages mainly inform that the sentence was successfully processed by the linguistic tool and was passed to following process.
The StreamGobblers manage the communication within the ParserTool and the system process in which the linguistic tool runs. The StreamGobbler ensures that all data addressed to the system process are immediately passed on his standard input. StreamGobblers also read standard and error outputs of every system process and pass the data back to the appropriate ParserTool. The employment of the StreamGobbler system is inspired by the paper [2].
As mentioned in the User documentation, linguistic tools run in background to provide the opportunity to use Procasor without the need to wait until linguistic operations are completed. This is implemented by running the Parser in an independent thread. When initializing the PipeLine, the Parser creates other threads for ParserTools. This approach allows to allocate a new thread for every important part of the PipeLine, which guarantees that each linguistic process can run independently of others.
The synchronization of threads in which ParserTools run is guaranteed by pipes connecting individual objects of the PipeLine.
As was described in the ParserTool chapter, all output messages are checked for error occurrences. The ParserTool is listening on channels connected to outputs of the linguistic tool which the ParserTool manages. Output messages are checked by regular expressions, this ensures that the data passed to following linguistic tool have the proper form. An unexpected behaviour of the linguistic tool is detected.
Because the synchronization of all members of the PipeLine is very important, the Parser needs to react to every error message. This is provided by the InfoQueue, which collects state informations from ParserTools. Every time an error occurs, it is immediately passed through the InfoQueue to the Parser.
In the case an error occurs - the ParserTool detects an unexpected output of a linguistic tools, the PipeLine is broken and the message describing such event is sent through InfoQueue to the Parser. The parser evaluates the received message, and starts closing of the Broken PipeLine. The ParserTool is closed immediately after it sends the message about its error state, other ParserTools are closed when the error message is received by the Parser.
The BrokenPipeLine is closed and we can start initialization of the new PipeLine, after that, the user can continue with sentence analysis.
The Parser generates a log file, where information describing processes and actions inside the PipeLine is gathered. Each line of the log file represents one message received either by the ParserTool - it is the output of the linguistic tool, or by the Parser - the message was generated by one of the ParserTools after the interpretation of the linguistic tool output.
An example of the log file content:
STARTING: USER location=Parser/runProcess
message: Initialization of the PipeLine...
...
STARTING: ADMIN location=MXPostTagger/runProcess
message: MXPostTagger:
Executing .mxpost tagger.project
...
RUNNING: ADMIN location=MXPostTagger/checkRunningError
message: MXPostTagger : Output >12 Seller NNP adjusts VBZ / DT
enters VBZ price NN and CC enters VBZ contact
NN and CC billing NN information NN . .
...
RUNNING: USER location=Parser/checkQueueRun
message: MXPostTagger: The sentence processed properly.
The first token defines the state of the PipeLine: starting, running, error or closing, then, type of the message follows: user or admin. The third token determines the place inside the program where the message was generated and the last token is the content of the message.
The type of the message determines whether the content of the message will be displayed on the Parser console (USER type messages will be displayed, ADMIN messages are hidden ).
The messages are passed to the log file by the ParserMessageSender class located in
cz.cuni.mff.procasor.gui. The log file is being recorded
into the file: "logs/pipeLine.log"
Regular expressions are an important part of error checking implemented in the Parser. Regular expression ensure, that output data of linguistic tool are processed properly, it means that the following linguistic tool will obtain the input, that has the required form.
In the case, that the output format of linguistic tool does not respond to the regular expression, the error message is sent through the InfoQueue to the Parser, linguistic process is stopped and the Parser is restarted as described in the section called “Restarting the Parser”.
The situation, that has lead to the unexpected output of the linguistic tools, is described in log file in detail, see the section called “Log File Format”. Analysis of the log file allows us to consider modification of regular expression - in the case that this modification will not affect following linguistic tools.
Procasor integrates four linguistic tools and the main issue of the application of employed tools is to provide the cooperation between these tools. To be able to connect all employed linguistic tools into one system we had to modify them.
The basic task of the application of linguistic tools is to process one sentence in order to obtain the parse tree of this sentence. However, linguistic tools were designed to process a batch of sentences. Such way of processing the data is absolutely inconvenient for Procasor.
Employed linguistic tools processed the data from their standard input, but the results were buffered and processed data could not be obtained immediately. For our purpose we need to have the output data immediately after the linguistic tool processes a sentence. To meet this requirements we modified linguistic tools in order to turn off buffering of the output.
The modification of the Collins parser was specific. The main difference was in the standard input of the parser. The tool did not processed data from its standard input, the sentences were read from the file specified in the input parameter of the Parser instead. From the standard input, the Collins parser read the statistical model which was used for the sentence processing.
Before employing the Collins parser into Procasor we have modified it, the tool now reads the statistical model from the file specified in its input parameters, this modification gives us the opportunity to read the input sentences from the standard input of the process. As for the other tools, buffering of the output has to be turned off.
The Procasor distribution contains the "config/" directory, where the configuration file used when Procasor launches linguistic tools can be found. In this file we store paths to locations, where linguistic tools used in Procasor can be found. This provides the opportunity to use linguistic tools which are not included in Procasor distribution. For example the user can use linguistic tools installed in other directories.
The configuration file thus provides the extensibility, which would allow to use the linguistic tool installed not only in other directories (because this is already provided) but also to use linguistic tools installed on other computers. See also the section called “Launching Linguistic Tools on Stand-alone Machine”.
For storing the data in configuration file we use XML. Each data segment has its own tag, which encloses the data value:
- CollinsParser, Morph, Tokenizer, MXPostTagger
These tags contain paths to the linguistic tools used in Procasor. The default values are relative paths (to the installation directory) to the linguistic tools included in the Procasor distribution. The user can change these values in order to use tools, which are not included in the distribution. For launching the external tools it is necessary to modify the value of the tag "fullpath".
- fullpath
This tag contains an integer value that sets whether paths to the linguistic tools are "relative" or "absolute". Default value is '0', which specifies that paths are relative. If the user want to use stand-alone linguistic tools, the value of this tag have to be changed to '1'. It is also required to set the paths of all linguistic tools to "absolute" paths.
- logs
This tag specifies the directory where the log files will be created.
The configuration data can be found in "config/config.xml" file, which is included under the Procasor root directory.
Table of Contents
The parser tends to misunderstand sentences or sentence fragments, that follow some patterns. It would help to override the parse tree in these cases. XSLT may be a way to do this.
If the parse tree analysis fails, we could try to make some suggestion to the user. For example, we may advise to add an actor to the use case, if an entity name is encountered, but it is not present in the use case.
Now, the Tokenizer only uses one variable - the percents of similarity to perform token learning. Instead of this single variable, it could use two different variables. One which will determine how similar the tokens have to be to perform the learned token generating process. The second one would determine whether the process was successful or not at the end of the generating process.
The next issue is that Tokenizer is not trying to analyse the token written by hand. There is a possibility that the user has written words which were in the sentence, so the Tokenizer could assign the token as a token not the written by hand.
While the way of using linguistic tools is not very complicated and data flow when parsing sentences is quite low, initialization processes are hardware and time demanding. The problems of launching the linguistic tools could be solved by running stand-alone machines which would provide the parse tree generation. This approach would allow to employ linguistic tools only when necessary and initialization process would be very fast.
In current version of Procasor we provide the config.xml file for launching linguistic tools from distant locations. We also provide the opportunity to use Procasor without running the linguistic tools.
Although Procasor is written in the Java language, the user can launch Procasor only on the Linux platform. This limitation is caused by employing linguistic tools which are not platform independent. To ensure platform independence, it would be necessary to modify the installation process, especially the to add a Perl distribution to the installation, since it may not be present on other platforms (e.g. Windows).
For the Pro-case derivation, the algorithm could be improved to identify additional Pro-case operators; especially the nesting call operator "{}" and the optionality operator "?".
Though we worked hard on designing the data structure, there is a detail which we will change next time. The binding of UseCase with the subUseCase relation should be a part of the Semantics, rather than of the Sentence. See the [Figure B.1, “Schema”] for the current state.
[1] Penn Treebank Project [http://www.cis.upenn.edu/~treebank/] .
[2] When Runtime.exec() won't [http://www.javaworld.com/javaworld/jw-12-2000/jw-1229-traps.html] .
[3] Tokenizer [http://www.clsp.jhu.edu/ws99/projects/mt/toolkit/] .
[4] A Maximum Entropy Part-Of-Speech Tagger [http://www.cis.upenn.edu/~adwait/statnlp.html] .
[5] A New Statistical Parser Based on Bigram Lexical Dependencies [http://www.cis.upenn.edu/~mcollins/ ].
[6] Morph-A tool [http://www.informatics.susx.ac.uk/research/nlp/carroll/morph.html] .
[7] Java 2 Standard Edition [http://java.sun.com/j2se] .
[8] Java Architecture for XML Binding [http://java.sun.com/xml/jaxb] .
[9] Java API for XML Processing [http://java.sun.com/xml/jaxp] .
[10] Project Swing (Java[tm] Foundation Classes) Software [http://java.sun.com/j2se/1.4.2/docs/guide/swing] .
Detailed API documentation of Procasor components in javadoc format is located in the
documentation/api folder of the distribution CD.
In this chapter we introduce task and documentation credits (in alphabetical order).
Project supervision:
- Vladimir Mencl
Task assignment:
- Michal Fiedler
Use case step analysis, Constructing behavior specifications, UML state machine generation, Data structures, Parse tree to XML conversion
- Jan Francu
Data structures, Token construction
- Jiri Ondrusek
Data structures, Graphic interface
- Ales Plsek
Linguistic tools integration, Use Case step mark validator, Documentation coordinator
Documentation:
- Michal Fiedler
User documentation: Background: Behavior protocols, Background: Pro-cases from Use Cases, The Procasor Project, Use Case Step Analysis, Constructing behavior specifications
Developer documentation: Used tools and Environment, Tree analysis, Behavior specification derivation, Future work
- Jan Francu
User documentation: Background:Use Cases, The Procasor Project, Token Generation
Developer documentation: Used tools and Environment, Data structures, Token construction, Future work
- Jiri Ondrusek
User documentation: User interface, Getting started, Example
- Ales Plsek
User documentation: Acknowledgment, Foreword, Brief Overview, Background:Linguistic Introduction, The Procasor project, Linguistic tools application, Installation manual, License
Developer documentation: Foreword, Linguistic tools application, Linguistic tools integration, Future work, Credits