Important: there are no ready USB drives in the library yet.
We will announce their availability here.
Update: USB disks are now available in the library.
Update: we have completed the text about dual-boot and virtualization and uploaded the disk images.
Table of contents
Linux installation
Unlike a programming language or photo editor trying an operating system is a bit more complicated. You will have access to a computer lab during the practicals yet it makes sense to have a machine with Linux more easily available than that.
Furthermore, the possibility of switching to distant teaching is still here.
Therefore it is necessary that every student arranges access to a machine with Linux himself as well. There are several options that depend on your hardware resources (e.g. free disk space) as well as on your experience.
To install Linux on your own machine (e.g. your laptop), following questions will help you select the best choice for you.
-
If you already have Linux on your machine, then you are obviously ready. Maybe you will only need to install few packages for some of the labs.
-
Do you have Mac or some other non-x86 machine? If yes, the easiest option is to run Linux in a virtual machine. You can choose whether to use a preinstalled disk or install it into the virtual machine yourself. And you are done.
Note that Linux is supported natively for non-x86 architectures as well. But the installation might be a bit more complex and we do not recommend it as a starting point if you are new to Linux.
If you have never heard about virtualization, this Wikipedia page might help you in understanding the basic concepts.
-
Assuming you have x86 machine: do you have at least 30 GB of free disk space? If yes, then we highly recommend to go for a dual-boot setup (i.e., you install Linux next to your existing system). If no, then you can boot Linux from an external drive such as USB stick as well.
If installing an operating system sounds scary, you can always start with the external USB stick or virtualization and switch to dual-boot later on. Though there really is nothing scary and we will try to help you.
Note that about 15 GB of free space could be enough for a minimal install but we highly recommend at least 30 GB to have also enough free space for your files.
Also note that with dual-boot you will have the best performance as virtualization is always slower than a native execution and performance of USB drives varies a lot.
For all of the above we provide installation images to download.
Our images are based on Fedora and contain prepackaged all the software that you will need for this course (hence their size).
In case you need to go for the option with a USB stick, we also offer a USB3 pendrive with Linux already preinstalled for you (if you do not have your own free USB stick available). They are available in the library.
Linux in dual-boot
The best option is to install Linux as a secondary system into so-called dual-boot. We recommend this option for more experienced students, though we will devote more time (and in more detailed form) to this topic later in the semester (so if you do not feel up to the task yet, pick another option for now).
The big advantage of this approach is ease of use (once installed) as well as typically the best performance.
It is necessary to prepare partitions (basically free space on the disk) beforehand (i.e. reduce amount used by your current operating system) and then complete the installation.
The most dangerous operation is editing the hard disk partitioning where careless action can result in data loss. On the other hand, there is no need to be afraid: the installation program asks several times before any desctructive action is performed. Really losing data requires quite an effort to pass through many alerts and confirmation dialogs.
As a special kind of this installation it is possible to install Linux on an external hard-drive (either classic rotating one or flash disk) where possiblity of data loss is minimized. The disadvantage is that you need to take care of an extra disk and perhaps a bit worse performance.
We will prepare a separate page for dual-boot setup soon, if you are eager to start installation right away, you may follow our hints from last year.
We provide a installation media as a Live medium from which you can boot Linux, explore it and also install it to your hard-drive.
Linux on a USB stick
In this setup, your Linux installation will reside on a separate disk that you can boot from. You can either prepare the disk yourself (i.e. download image from us) or borrow a prepared USB stick from the library. In the end, it is rather similar to classic dual-boot, only the second system is on an external drive.
The advantage of this approach is that you will have access to a system where all needed software is pre-installed and you would not need to modify anything on your computer. Disadvantage is slightly worse performance (though with USB 3.0 connected disk the work is very comfortable).
Downloading and burning disk image
After you download the disk image (links at the end of the page) it is necessary to copy it to your flash drive. During the copying, all data on the flash disk will be removed.
It is required to use a special software for the copying,
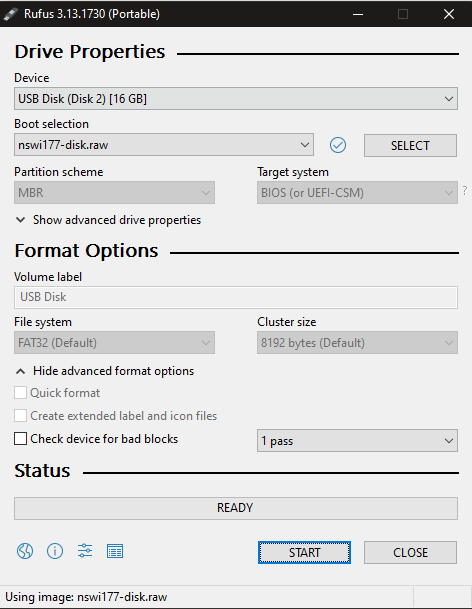
for Windows we recommend Rufus,
for users of operting systems from the Unix family the
best option is to use the dd command.
Copying the file as-is will not work.
Other options for burning to USB drive
(for various operating systems) are described also
here.
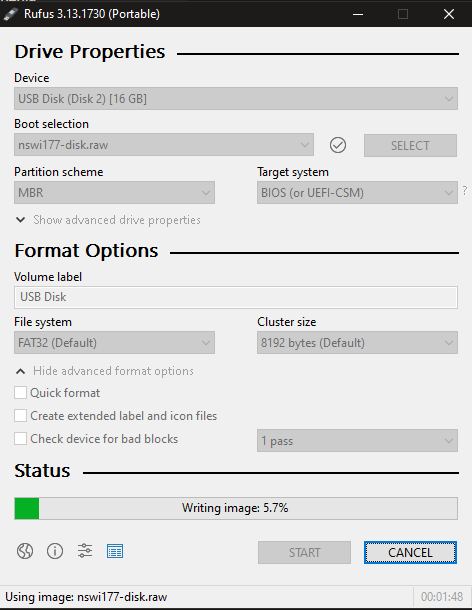
In Rufus, select your flash drive, the image you downloaded from us and then just use START to initiate the copying and wait for completion.
Recommended disk size
We expect (and recommend) that you would use flash disk with at least 32GB capacity.
If you do not have access to such disk, consider borrowing one from the library.
First boot
We need to select booting from the USB disk. This option is typically available via one of the function keys (typical options include F2, F10, F12, Esc or even Enter), usually look for Select boot device message.
In case such option would not appear, it is needed to change your BIOS settings to allow booting from USB drive. Entering BIOS is typically done again using one of the keys mentioned above. If a prompt to enter BIOS would not appear, try the approach described here.
We recommend to keep the menu visible during each boot or keep boot from USB drive as the first one. Thus, if you connect the USB disk, system will boot from it, otherwise it will continue to boot from (internal) hard drive. (More detailed description is for example here.)
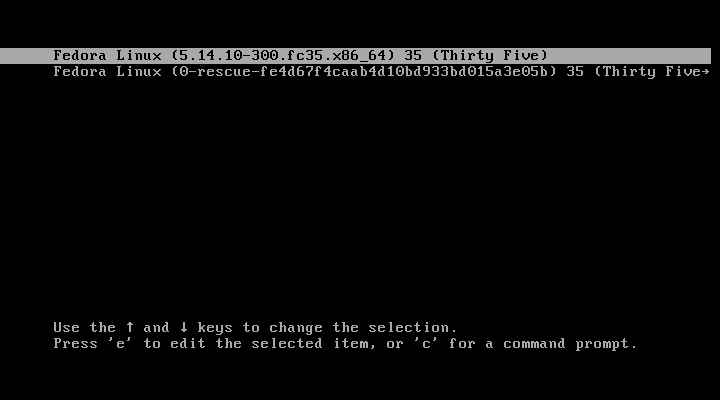
Note that depending on your machine (manufacturer, to be more precise), you may need to go through multiple menu layers (such as Interrupt normal startup, then Boot from other device… and finally Boot from ADATA USB where you will be able to choose item named Fedora).
Following screens will then appear, the last one is the login dialog.
You can login using username intro and password linux.
Change this password as soon as possible (and for root too).
Other languages can be selected from the panel at the bottom of the
screen.


If you would like to return to your original operating system, you only need to restart the machine and select Boot from hard-disk or similar option during boot.
Modified files, browser history etc. will remain on the USB drive so you can continue in your work on next boot. Because of this, we highly recommend to eject the USB drive after restarting and to restart softly via menu option (i.e. not by forcefully rebooting though single-click on the Power button should shutdown the machine nicely).
Virtualization
If none of the options above is available for you, it is also possible to run Linux virtualized inside your existing operating system. Thus you will have a special program running that would emulate hardware and provide illusion of another machine for your Linux.
The disadvantage of this solution is that it is a bit clumsier for use and worse performance. On the other hand, it is an extremely safe solution, especially if you want to experiment with it.
On Windows
We recommend to use VirtualBox as the virtualization software.
The method is then the same: you can install Linux by yourself or you can use the prepared image from us. We provide (virtual) hard drive image for VirtualBox.
In case you will be using image from us, it is necessary to prepare a virtual machine (through the wizard) and connect it to the disk (we recommend at least 1024MB of RAM).
On macOS
For various reasons we strongly suggest you do not try dualboot if you work on macOS but instead opt for virtualization.
We recommend you to use QEMU
(VirtualBox has issues because of installation of kernel drivers).
QEMU can be installed by running brew install qemu in your Terminal.app
(this requires the brew.sh package manager).
Virtual machine is then launched by running following command.
On the macOS Big Sur and later you will probably face the HV_ERROR error.
The solution is here.
Part -m 2G denotes amount of memory given to the virtual machine
(you may wish to update this setting).
qemu-system-x86_64 -accel hvf -cpu host -m 2G -smp 2 -hda nswi177-disk-image-fedora.qcow2
Downloads
The disk images are stored on CUNI Sharepoint, you need to authenticate
with your University credentials first
(assuming you have johndoe username for SIS, enter
johndoe@o365.cuni.cz as your e-mail on the Sharepoint login page and
then you will authenticate via central university system).
Files are in the images/ subfolder.