Labs: 1, 2, 3, 4, 5, 6, 7, 8, 9, 10, 11, 12, 13, 14.
The goal of this lab is to introduce you to the Git command-line client to make our communication with GitLab much more efficient. We will also extend our knowledge about shell scripting a bit.
Preflight checklist ⚓
- You understand the concept of standard input and output and how they can be redirected (and chained) in shell.
- You can set a correct shebang and set executable bit to simplify launching of your scripts.
Git principles ⚓
So far, our interaction with GitLab was over its GUI. We will switch to the command line for higher efficiency now.
Recall that GitLab is built on top of Git which is the actual versioning system used.
Git offers a command-line client that can download the whole project to your machine, track changes in it, and then upload it back to the server (GitLab in our case, but there are other products, too).
Before diving into Git itself, we need to prepare our environment a bit.
Setting your editor ⚓
Git will often need to run your editor. It is essential to ensure it uses the editor of your choice.
We will explain the following steps in more detail later on, for now ensure that
you add the following line to the end of ~/.bashrc file
(replace mcedit with editor of your choice):
export EDITOR=mcedit
Now open a new terminal and run (including the dollar sign):
$EDITOR ~/.bashrc
If you set the above correctly, you should see again .bashrc opened
in your favorite text editor.
If not, ensure you have really modified your .bashrc file (in your home
directory) to contain the same as above (no spaces around = etc.).
The git command ⚓
Virtually everything around Git is performed by its git command. Its first
argument is always the actual action – often called a subcommand –
that we want to perform.
For example, there is git config to configure Git and git commit to perform
a commit (create a version).
There is always a built-in help available via the following command:
git SUBCOMMAND --help
Manual pages are also available as man git-SUBCOMMAND.
Git has over 100 subcommands available. Don’t panic, though. We will start with less than 10 of them and even quite advanced usage requires knowledge of no more than 20 of them.
Configure Git ⚓
One of the key concepts in Git is that each commit (change) is authored – i.e., it is known who made it. (Git also supports cryptographic signatures of commits, so that authorship cannot be forged, but let us keep things simple for now.)
Thus, we need to tell Git who we are. The following two commands are the absolute minimum you need to execute on any machine (or account) where you want to use Git.
git config --global user.name "My real name"
git config --global user.email "my-email"
The --global flag specifies that this setting is valid for all Git projects.
You can change this locally by running the same command without this flag
inside a specific project.
That can be useful to distinguish your free-lance and corporate identity, for example.
Note that Git does not check the validity of your e-mail address or your name (indeed, there is no way how to do it). Therefore, anything can be there. However, if you use your real e-mail address, GitLab will be able to pair the commit with your account etc. which can be quite useful. The decision is up to you.
Working copy (a.k.a. using Git locally) ⚓
The very first operation you need to perform is so called clone. During cloning, you copy your project source code from the server (GitLab) to your local machine. The server may require authentication for cloning to happen.
Cloning also copies the whole history of the project. Once you clone the project, you can view all the commits you have made so far. Without need for an internet connection.
The clone is often called a working copy. As a matter of fact, the clone is a 1:1 copy, so if someone deleted the project, you would be able to recreate the source code without any problem. (That is not true about the Issues or the Wiki as it applies only to the Git-versioned part of the project.)
As you will see, the whole project as you see it on GitLab becomes a directory on your hard-drive. As usual, there are also GUI alternatives to the commands we will be showing here, but we will focus our attention on the CLI variants only.
Cloning for the first time (git clone) ⚓
For the following example, we will be using your submission repository under teaching/nswi177/2026/.
Move to your project (in the web browser) and click on the blue Clone button. You should see Clone with SSH and Clone with HTTPS addresses.
Copy the HTTPS address and use it as the correct address for the clone
command (obviously, replace LOGIN with your actual login, in lower case):
git clone https://gitlab.mff.cuni.cz/teaching/nswi177/2026/student-LOGIN.git
The command will ask you for your username and password. As usual with our GitLab, please use the SIS credentials.
Note that some environments may offer you to use some kind of a keyring or another form of a credential helper (to store your password). Feel free to use them, later on, we will see how to use SSH and asymmetric cryptography for seamless work with Git projects without any need for username/password handling.
Note that you should have the student-LOGIN directory on your machine now.
Move to it and see what files are there.
What about hidden files?
Answer.
Unless stated otherwise, all commands will be executed from the student-LOGIN
directory.
After the project is cloned, you can start editing files. This is completely orthogonal to Git and until you explicitly tell Git to do something, it does not touch your files at all.
Once you are finished with your changes (e.g., you fixed a certain bug), it is time to tell Git about the new revision.
Making changes (git status and git diff) ⚓
Before changing any file locally, open a new terminal and run git status.
You should see something like this.
$ git status
On branch master
Your branch is up to date with 'origin/master'.

nothing to commit, working tree clean
We will now do a trivial change. Open the README.md file in
your project (locally, i.e., not in GitLab browser UI) and add a link
to the Forum there.
Notice how links are created in Markdown and add your link as the last paragraph.
Run git status after the change.
Read carefully the whole output of this command to understand what it reports.
Create a new file, 04/editor.txt and put into it the name of the editor
that you have decided to use (feel free to create directory 04 in some
graphical tool or mc or use mkdir 04).
Again, check how git status reports this change in your project directory.
What have you learned? Answer.
Run git diff to see how Git tracks the changes you made.
You will see a list of modified files (i.e., their content differs from last commit) and you can also see a so called diff (sometimes also called a patch) that describes the change.
The diff will typically look like this:
diff --git a/README.md b/README.md
index 39abc23..61ad679 100644
--- a/README.md
+++ b/README.md
@@ -3,3 +3,5 @@
 find and check your solution.

 Course homepage: https://d3s.mff.cuni.cz/teaching/nswi177/
+
+Forum is at ...
How to read it? It is a piece of plain text that contains the following information:
- the file where the change happened
- the context of the change
- line numbers (
-3,3 +3,5) - lines without modifications (starting with space)
- line numbers (
- the actual change
- lines added (starting with
+) - lines removed (starting with
-)
- lines added (starting with
Why this output is suitable for source code changes?
Note that git diff is also extremely useful to check that the change you
made is correct as it focuses on the context of the change rather than the
whole file.
Making the change permanent (git add and git commit) ⚓
Once you are happy with these changes, you can stage the changes. This is Git-speak for saying these files (their current content) will be in the next revision. Often, you will stage all changed files. But sometimes you may want to split the commit as you actually worked on two different things and first you commit one part and then the other.
For example, you were fixing a bug, but also encountered a typo somewhere along the way. It is possible to add them both to the same commit, but it is much better to keep the commits well organized. The first commit would be a Fix a bug in X, the second one will be Fix a typo in Y.
That clearly states what the commit changed. It is actually similar to how you create functions in a programming language. A single function should do one thing (and do it well). A single commit should capture one change.
Now prepare your first commit (recall that commit is basically
a version or a named state of the project) – run git add 04/editor.txt.
We will take care of the extension in README.md later.
How git status differs from the previous state?
Answer.
After staging all the relevant changes (i.e. git add-ing all the needed files),
you create a commit.
The commit clears the staging status and you can work on fixing another bug :-).
Make your first commit via git commit. Do not forget to use a descriptive commit message!
Note that without any other options, git commit will open your text editor.
Write the commit message there and quit the editor (save the file first).
Your commit is done.
For short commit messages, you may use git commit -m "Fix a typo" where the whole commit
message is given as argument to the -m option (notice the quotes because of the spaces).
How will git status look like now?
Think about it first before actually running the command!
You basically repeat this as long as you need to make changes. Recall that each commit should capture a reasonable state of the project that is worth returning to later.
Sending the changes to the server ⚓
To upload the changes (commits) back to the server, you need to initiate a so-called push. It uploads all new commits (i.e., those between your clone operation and now) back to the server. The command is rather simple.
git push
It will again ask for your password (unless your desktop environment decided to reuse credentials from before) and after that, you should see your changes on GitLab.
Which changes are on GitLab? Answer.
Exercise ⚓
Browsing through the commits (git log) ⚓
Investigate what is in the Repository -> Commits menu in GitLab.
Compare it with the output of git log and git log --oneline.
Yes, commands can be even that simple.
Getting the changes from the server ⚓
Change the title in the README.md to also contain for YOUR NAME.
But this time make the change on GitLab.
To update your local clone of the project, execute git pull.
What is the easiest way to ensure that you have also the change in README.md
on your machine after git pull?
Answer.
Note that git pull is quite powerful as it can incorporate changes that
happened virtually at the same time in both GitLab web UI as well as in
your local clone.
However, understanding this process requires also knowledge about
branches, which is out-of-scope for this lab.
Working on multiple machines ⚓
Things get a little bit more complex when you work on multiple machines (e.g., mornings at a school desktop, evenings at your personal notebook).
Git is really powerful and can do extraordinary merges of your work.
But for now it is best to ensure the following workflow to minimize introducing incompatible changes.
Note that if things go horribly wrong, you can always do a fresh clone to a different directory, copy the files manually and remove the broken clone.
Once you forgot some of the synchronizing pulls/pushes when switching between machines, problems can arise. They are easy to solve, but we will talk about that in later labs.
For now, you can always do a fresh clone and simply copy files with the new changes and commit again (not the right Git way, but it definitely works).
Going further ⚓
Don’t panic ⚓
It might seem that there are too many Git commands and the whole workflow is too complex. It might be for the first few days. Once you start using them regularly the interaction with Git would fade into background as a natural part of the development process.
After all, Git is only used to track changes. The important part is happening elsewhere. It is only a helper tool but it makes the process of keeping history and collaboration somewhat easier.
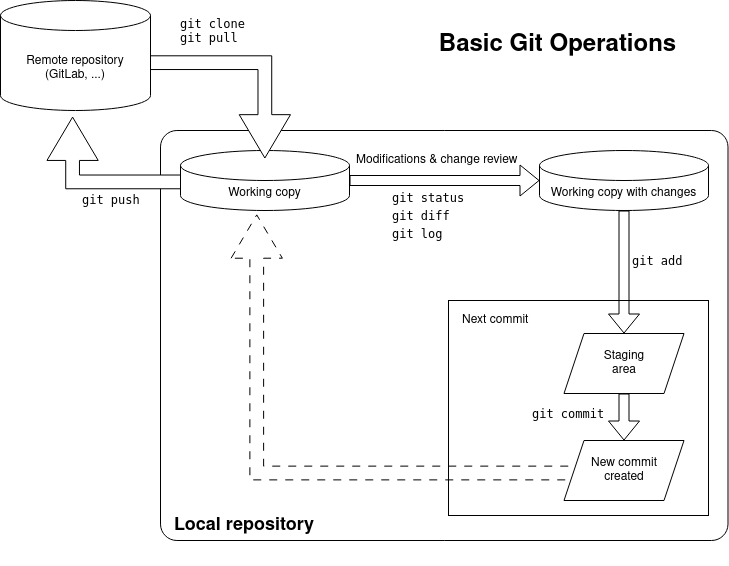
Below is a small diagram of the basic operations and their ordering/relation.
Git: check you remember the basic commands
Select all true statements.
You need to have enabled JavaScript for the quiz to work.More about shebangs ⚓
In this part of the lab we will return a bit to the previous lab and extend our knowledge about shebangs.
Using other interpreters ⚓
Construct an absolute (!) path (hint: man 1 realpath) to the args.py
that we have used before.
Use it as a shebang on an otherwise empty file (e.g. use-args) and make this file executable.
Hint.
And now run it like this:
./use-args
./use-args first second
You will see that the argument zero now contains a path to your script.
Argument on index one contains the outer script – use-args and only after
these items are the actual command-line arguments (first and second).
While it may seem as an exercise in futility, it demonstrates an important principle: GNU/Linux is extremely friendly towards the creation of mini-languages. If you need to create an interpreter for your own mini-language, you only need to make sure it accepts the input filename as the first argument. And voilà, users can create their own executables on the top of it.
As another example, prepare the following file and store it
as experiment (with no file extension)
and make the file executable:
#!/bin/sh

echo Hello
Note that we decided to drop the extension again altogether. The user does not really need to know which language was used. That is captured by the shebang, after all.
Now change the shebang to #!/bin/cat.
Run the program again.
What happens?
Now run it with an argument (e.g., ./experiment experiment).
What happened?
Answer.
Change the shebang to /bin/echo. What happened?
Shebang: check you understand the basics ⚓
We will assume that both my-cat and my-echo are executable scripts
in the current directory.
my-cat contains as the only content the following shebang #!/bin/cat and
my-echo contains only #!/bin/echo.
Select all true statements.
You need to have enabled JavaScript for the quiz to work.Running tests locally ⚓
Because you now know about shebangs, executable bits and scripts in general, you have enough knowledge to actually run our tests locally without needing GitLab.
It should make your development faster and more natural as you do not need to wait for GitLab.
Simply execute ./bin/run_tests.sh in the root directory of your project
and check the results.
You can even run only a specific subset of tests.
./bin/run_tests.sh 04
./bin/run_tests.sh 02/architecture
Note: If you are using your own installation of Linux, you might need
to install the bats (or bash-bats or bats-core) package first.
Writing your own filters ⚓
Let us finish another part of the running example from the previous lab: we want to compute traffic for each day and print days with the most traffic.
Knowing how we composed things so far, we lack only the middle part of the pipeline. Summing the sizes for each day.
There is no ready-made solution for this (advanced users might consider
installing termsql) but we will
create our own in Python and plug it into our pipeline.
We will try to make it simple yet versatile enough.
Recall we want to group the traffic by dates, hence our program should be able to do the following transformation.
# Input
day1 1
day1 2
day2 4
day1 3
day2 1
# Output
day1 6
day2 5
Here is our version of the program. Notice that we have (for now) ignored error handling but allowed the program to be used as a filter in the middle of the pipeline (i.e., read from stdin when no arguments are provided) but also easily usable for multiple files.
In your own filters, you should also follow this approach: the amount of source code you need to write is negligible, but it gives the user flexibility in use.
#!/usr/bin/env python3

import sys

def sum_file(inp, results):
    for line in inp:
        (key, number) = line.split(maxsplit=1)
        results[key] = results.get(key, 0) + int(number)

def main():
    sums = {}
    if len(sys.argv) == 1:
        sum_file(sys.stdin, sums)
    else:
        for filename in sys.argv[1:]:
            with open(filename, "r") as inp:
                sum_file(inp, sums)
    for key, sum in sums.items():
        print(f"{key} {sum}")

if __name__ == "__main__":
    main()
With such program in place, we can extend our web statistics script in the following manner.
cat logs/*.csv | cut -d , -f 1,4 | tr ',' ' ' | ./group_sum.py
Use man to find out what tr does.
On your own, extend the solution to print only the top 3 days
(sort can order the lines using different columns than the whole line too).
Answer.
More about standard I/O and redirection ⚓
We have discussed the basics in the last lab. In this text we expand on the topic.
Standard error output ⚓
While it often makes sense to redirect the output, you often want to see error messages still on the screen.
Imagine files one.txt and two.txt exist while nonexistent.txt is
not in the directory.
We will now execute the following command.
No, do not imagine it. Create the files one.txt and two.txt to contain words ONE and
TWO yourself on the command line.
Hint.
Answer.
cat one.txt nonexistent.txt two.txt >merged.txt
Obviously, cat prints an error message when the file does not exist.
However, if the error message were printed to stdout, it would be redirected
to merged.txt together with the actual output. This would not be practical.
Therefore, every Linux program also has a standard error output
(often just stderr) that also goes to the screen but is logically
different from stdout and is not subject to > redirection.
In Python, it is available as sys.stderr and it is (as sys.stdout)
an opened file.
We can extend our implementation to handle I/O errors like this:
try:
    with open(filename, "r") as inp:
        sum_file(inp, sums)
except IOError as e:
    print(f"Error reading file {filename}: {e}", file=sys.stderr)
Under the hood (about file descriptors) ⚓
The following text provides overview of file descriptors that are abstractions used by the OS and the application when working with opened files. Understanding this concept is not essential for this course but it is a general principle that (to some extent) is present in most operating systems and applications (or programming languages).
Advanced I/O redirection ⚓
Ensure you have the group_sum.py script available.
Prepare files one.txt and two.txt:
echo ONE 1 > one.txt
echo ONE 1 > two.txt
echo TWO 2 >> two.txt
Now execute the following commands.
./group_sum.py <one.txt
./group_sum.py one.txt
./group_sum.py one.txt two.txt
./group_sum.py one.txt <two.txt
Has it behaved as you expected?
Trace which paths (i.e. through which lines) the program has taken with the above invocations.
Redirecting standard error output ⚓
To redirect the standard error output, you can use > again, but this time preceded
by the number 2 (that denotes the stderr file descriptor).
Hence, our cat example can be transformed to the following form where err.txt
would contain the error message and nothing would be printed on the screen.
cat one.txt nonexistent.txt two.txt >merged.txt 2>err.txt
Generic redirection ⚓
Shell allows us to redirect outputs quite freely using file descriptor numbers before and after the greater-than sign.
For example, >&2 specifies that the standard output is redirected to a standard
error output.
That may sound weird but consider the following mini-script.
Here, wget used to fetch file from given URL.
echo "Downloading tarball for lab 02..." >&2
wget https://d3s.mff.cuni.cz/f/teaching/nswi177/202324/labs/nswi177-lab02.tar.gz 2>/dev/null
We actually want to hide the progress messages of wget and print ours instead.
Take this as an illustration of the concept as wget can be silenced via
command-line arguments (--quiet) as well.
Sometimes, we want to redirect stdout and stderr to one single file.
In these situations simple >output.txt 2>output.txt would not work
and we have to use >output.txt 2>&1 or &>output.txt (to redirect
both at once).
However, what about 2>&1 >output.txt, can we use it as well?
Try it yourself!
Hint.
Notable special files ⚓
We already mentioned that virtually everything in Linux is a file.
Many special files representing devices are in /dev/ subdirectory.
Some of them are very useful for output redirection.
Run cat one.txt and redirect the output to /dev/full and then
to /dev/null.
What happened?
Especially /dev/null is a very useful file as it can be used in any
situation when we are not interested in the output of a program.
For many programs you can specify the use of stdin explicitly
by using - (dash) as the input filename.
Another option is to use /dev/stdin explicitly: with this name,
we can make the example with group_sum.py work:
./group_sum.py /dev/stdin one.txt <two.txt
Then Python opens the file /dev/stdin as a file and operating system
(together with shell) actually connects it with two.txt.
/dev/stdout can be used if we want to specify standard output explicitly
(this is mostly useful for programs coming from other environments where
the emphasis is not on using stdout that much).
Program return (exit) code ⚓
So far, the programs we have used announced errors as messages. That is quite useful for interactive programs as the user wants to know what went wrong.
However, for non-interactive use, checking for error messages is actually very error-prone. Error messages change, the users can have their system localized etc. etc. Therefore, Linux offers a different way of checking whether a program terminated correctly or not.
Whether a program terminates successfully or with a failure, is signalled by its so-called return (or exit) code. This code is an integer and unlike in other programming languages, zero denotes success and any non-zero value denotes an error.
Why do you think that the authors decided that zero (that is traditionally reserved for false) means success and nonzero (traditionally converted to true) means failure? Hint: in how many ways can a program succeed?
Unless specified otherwise, when your program terminates normally
(i.e., main reaches the end and no exception is raised), the exit code is
zero.
If you want to change this behavior, you need to specify this exit code
as a parameter to the exit function.
In Python, it is sys.exit.
As an example, the following is a modification of the group_sum.py above,
this time with proper exit code handling.
def main():
    sums = {}
    exit_code = 0
    if len(sys.argv) == 1:
        sum_file(sys.stdin, sums)
    else:
        for filename in sys.argv[1:]:
            try:
                with open(filename, "r") as inp:
                    sum_file(inp, sums)
            except IOError as e:
                print(f"Error reading file {filename}: {e}", file=sys.stderr)
                exit_code = 1
    for key, sum in sums.items():
        print(f"{key} {sum}")
    sys.exit(exit_code)
We will later see that shell control flow (e.g., conditions and loops) is actually controlled by program exit codes.
Failing fast ⚓
So far, we expected that our shell scripts will never fail. We have not prepared them for any kind of failure.
We will eventually see how exit codes can be tested and used to control our shell scripts more, but for now we want to stop whenever any failure occurs.
That is actually quite sane behavior: you typically want the whole program to terminate if there is an unexpected failure (rather than continuing with inconsistent data). Like an uncaught exception in Python.
To enable terminate-on-failure, you need to call set -e. In case of failure,
the shell will stop executing the script and exit with the same exit code as
the failed command.
Furthermore, you usually want to terminate the script when an uninitialized variable is
used: that is enabled by set -u.
We will talk about variables later but -e and -u are usually set together.
And there is also a caveat regarding pipes and success of commands: the success of a
pipeline is determined by its last command.
Thus, sort /nonexistent | head is
a successful command. To make a failure of any command fail the (whole) pipeline, you
need to run set -o pipefail in your script (or shell) before the pipeline.
Therefore, typically, you want to start your script with the following trio:
set -o pipefail
set -e
set -u
Many commands allow short options (such as -l or -h you know from ls)
to be merged like this (note that -o pipefail has to be last):
set -ueo pipefail
Get into a habit where each of your scripts starts with this command.
Actually, from now on, the GitLab pipeline will check that this command is a part of your scripts.
Pitfalls of pipes (a.k.a. SIGPIPE) ⚓
Exit code: check you understand the basics ⚓
Shell customization ⚓
We already mentioned that you should customize your terminal emulator to make it comfortable to use. After all, you will spend at least this semester with it and it should be fun to use.
In this lab, we will show some other options how to make your shell more comfortable to use.
Command aliases ⚓
You probably noticed that you execute some commands with the same options
a lot.
One such example could be ls -l -h that prints a detailed file listing, using
human-readable sizes.
Or perhaps ls -F to append a slash to the directories.
And probably ls --color, too.
Shell offers to create so-called aliases where you can easily add new commands without creating full-fledged scripts somewhere.
Try executing the following commands to see how a new command l could be
defined.
alias l='ls -l -h'
l
We can even override the original command, the shell will ensure that rewriting is not a recursive.
alias ls='ls -F --color=auto'
Note that these two aliases together also ensure that l will display
filenames in colors.
There are no spaces around the equal sign.
Some typical aliases that you will probably want to try are the following
ones.
Use a manual page if you are unsure what the alias does.
Note that curl is used to retrieve contents from a URL and wttr.in is really
a URL.
By the way, try that command even if you do not plan to use this alias :-).
alias ls='ls -F --color=auto'
alias ll='ls -l'
alias l='ls -l -h'

alias cp='cp -i'
alias mv='mv -i'
alias rm='rm -i'

alias man='man -a'

alias weather='curl wttr.in'
~/.bashrc ⚓
Aliases above are nice, but you probably do not want to define them each time
you launch the shell.
However, most shells in Linux have some kind of file that they execute before
they enter interactive mode.
Typically, the file resides directly in your home directory and it is named after
the shell, ending with rc (you can remember it as runtime configuration).
For Bash which we are using now (if you are using a different shell, you
probably already know where to find its configuration files), that file is
called ~/.bashrc.
You have already used it when setting EDITOR for Git, but you can also add
aliases there.
Depending on your distribution, you may already see some aliases or some
other commands there.
Add aliases you like there, save the file and launch a new terminal. Check that the aliases work.
The .bashrc file behaves as a shell script and you are not limited to
have only aliases there.
Virtually any commands can be there that you want to execute in every
terminal that you launch.
Changing your prompt ($PS1) ⚓
You can also modify how your prompt looks like. The default is usually reasonable but some people prefer more information in there. If you are one of those, here are the details (take it as an overview as prompt customization is a topic for a whole book).
Tasks to check your understanding ⚓
We expect you will solve the following tasks before attending the labs so that we can discuss your solutions during the lab.
Learning outcomes and after class checklist ⚓
This section offers a condensed view of fundamental concepts and skills that you should be able to explain and/or use after each lesson. They also represent the bare minimum required for understanding subsequent labs (and other courses as well).
After class checklist ⚓
The list below captures the most important actions that you should have completed by now. Not having them done will make the next lab impossible to complete or will greatly hinder your progress.
- I can operate (clone, pull, push, commit) my Git repository from the command-line.
Conceptual knowledge ⚓
Conceptual knowledge is about understanding the meaning and context of given terms and putting them into context. Therefore, you should be able to …
-
explain what is a Git working copy (clone)
-
explain why there are two output streams: stdout and stderr
-
explain what is program exit code
-
explain differences and typical uses for the main five interfaces of a command-line program: command-line arguments, stdin, stdout, stderr, and exit code
-
optional: explain what is a file descriptor (from the perspective of a userland developer)
Practical skills ⚓
Practical skills are usually about usage of given programs to solve various tasks. Therefore, you should be able to …
-
configure author information in Git
-
setup default editor in a shell (set
EDITORin~/.bashrc) -
clone a Git repository over HTTPS in shell
-
review changes in a Git working copy (
git statuscommand) -
create a Git commit from command-line (
git addandgit commitcommands) -
upload new commits to Git server or download new ones to a working copy (assuming single user project,
git pushandgit pullcommands) -
view summary information about previous commits using
git log -
optional: customize Git with aliases
-
redirect standard output and standard error output of a program in shell
-
set exit code of a Python script
-
use the special file
/dev/null -
use standard error output in Python
-
optional: customize shell script with aliases
-
optional: store custom shell configuration in
.bashrc(or.profile) scripts -
optional: customize prompt with the
PS1variable