Labs: 1, 2, 3, 4, 5, 6, 7, 8, 9, 10, 11, 12, 13, 14.
Before actually diving into Linux, we need to explain how the course is organized and how you will be graded.
Course organization ⚓
Because this is a highly practically oriented course there is a great stress on before class preparation. We strongly believe that you can learn topics of this course only if you try them yourself. Doing that during the labs is often not the best course of action as it allows to pass the lab without doing much yet having the feeling of good understanding. Which is usually proved wrong when you complete the graded assignments.
Therefore we decided that before coming to the labs you will study the materials yourself and lab will be used to (a) discuss your solutions (b) answer your questions and (c) do more examples.
We will publish lab contents several weeks ahead so you can organize your time as you see fit. There will be several tasks at the end of each lab – we provide automated tests for these so you can check that your solution works as expected and you can use these tasks to verify that you understood the basic principles correctly. We will look at your solutions during the labs, discuss unclarities and thus strengthen your knowledge.
To actually assess your skills and knowledge you will need to complete several graded homework assignments as well as pass several tests on-site (they will be given at the beginning of the lab). Their results will form your final grade.
This is explained in more detail in the course guide.
In this lab we will cover basic concepts of Linux, source code versioning and also how to submit the self-evaluation tasks.
Purpose of this course ⚓
The purpose of this course is not only to show you a different operating system but also to show you a different style of work.
We expect that after this course, you will be able to do the following:
- Use Linux as a user for your everyday work. This includes the activity of normal user such as reading e-mails as well as activities of a power user who can really control his machine.
- Use typical Linux tools with ease. We will not spend our time on common software such as a web browser or image editor that you can find virtually anywhere, but focus on tools that are closer to the system itself.
- Automate your work a lot. You will learn that many everyday tasks can be simplified by writing small programs that automate them. Linux offers the right environment for this.
On the other hand, this course does not cover machine administration (except for the fundamentals required to maintain your laptop) or compiling your own kernel.
What is Linux ⚓
Under the term Linux we mean the operating system and software that is typically available on such system. This includes – but is not limited to – development tools (compilers etc.), graphical environment, text editors, spreadsheet software, web browsers etc.
You will also often hear the term Linux distribution. That is a fancy name for a packaging of the Linux kernel (i.e. the lowest layer of the software stack) and user applications. There are hundreds of distributions available, some differ only in the default wallpaper, some are specific for a certain domain (e.g., network testing).
Their fundamental differences are mostly on maintenance level, e.g. how software is installed or how the system is configured. Most of the time end users do not need to care at all which distribution they use.
We will be using Fedora which is a generic distribution that can run on servers as well as on desktops. If you are new to Linux we strongly recommend to stay with our choice and use our installation.
Although many of the Linux concepts as well as the software available on Linux is also present in other operating systems, Linux provides them in a nice integrated packaging. Also we believe that only Linux provides an environment for their seamless integration.
Linux is conceptually not a unique system: it follows a long history of unix operating systems that exist in many flavors and share the same API. This API defines the semantics of most system calls (the communication interface between end-user applications and OS kernel) and also the availability and behavior of basic system tools and utilities.
Obviously there are some differences but generally most of the commands you will learn about in this Linux course will work (almost) the same in other systems from the unix family: that includes the range of various BSD systems, Oracle Solaris, HP-UX, IBM AIX or Darwin/macOS.
Not all of these are available for free or are open sourced; some are built on top of the traditional concepts of unix systems but they hide them completely from the user to offer more intuitive – but also more restricted – interface.
Key concepts of Linux ⚓
Here we list the key concepts of a Linux environment. Take it as an overview only, we will provide further details in subsequent labs.
Linux uses open-source software (OSS). That means that you are free to inspect how things are implemented. You are also free to change the implementation. Do not underestimate this aspect. It is really important. And as a sidenote: even with OSS one can earn money.
Linux is extremely flexible and customizable. You can run Linux on IoT devices as well as on heavy-duty routers. Linux is running on cell-phones as well as supercomputers. The user can configure virtually anything. Traditionally, configuration is stored as plain text files. While it is often possible to edit the configuration from a GUI-based tool, Linux always allows the user to edit the file manually. An advanced user virtually needs only a good text editor to configure the whole system.
Linux also has a graphical user interface. But it is an optional part of the system as it is not always needed. Server-style machines do not need any movable windows to operate. And when you need the GUI, you can choose from many types to best suit your needs. From the system perspective, GUI is just another application running in the system, not a part of the system.
Linux excels when controlled through a command-line interface (CLI). While entering textual commands might seem a very obsolete way of controlling your machine, it is not. After all, most programming languages are still based on textual source code. And CLI has many advantages over a GUI: it is explicit and easily automated. It is also perfect for remote access as it is very modest on resources.
Probably the most important concept is that everything is a file.
This means that even your devices – such as the hard-drive – are available
as normal files that can be read or written. This actually simplifies
implementation of the tools and it enables fuller control over the system.
But it does not stop with devices: even information about your system – such
as list of running programs – is available as a contents of a special file.
This is a great thing for a programmer: virtually you need only file API
(such as Pythonic with open("filename", "r") as f) to get all the
information about the system.
Linux is by default a multi-user system. Not only that it allows to set up user accounts, but multiple users can use the system at the same time. They can be connected remotely, but it is even possible to use a machine with a dual-head graphical card and two keyboards by two people simultaneously.
Linux also prides itself on remote access support. As long as your system is connected to a network, you can configure it to be remotely accessible. This simplifies management of server machines, but it can be useful even for your laptop left at home. While remote CLI access is usually preferred, it is possible to connect graphically, too. Actually, you can even connect graphically in several instances at once, each using a different environment.
Linux simplifies management of installed software by use of packages. They can be roughly compared to various Stores that you may know from your cell-phones. They simplify the installation as you do not need to click through any installation wizard and package managers also keep your system up to date.
Probably the most important concept is that user is in control of the machine. The philosophy is that the user is smart enough to control the computer and Linux does virtually nothing without explicit action and does not hide information from you. You can configure it to do things automatically, but it is always a layer on top of the base system. You do not need special tools to look inside.
First steps inside Linux ⚓
Here we assume that you have your USB disk ready or you have your virtual machine running. Please, refer to another page on how to actually boot your machine to Linux.
Selecting your desktop environment ⚓
Once you boot from our disk, you can choose which desktop environment you will use.
On most operating systems, there are not many options on how to control your graphical interface. With Linux, there is a much wider choice. It ranges from rich environments with a plenty of eye-candy to very austere ones that do not even employ a mouse. Of course, there are dozens of environments somewhere in between.
Recall that this is easily possible, because the GUI is actually controlled by a normal application: it is not hard-wired into the system.
On your installation, you can choose from several different environments:

GNOME, Plasma (a.k.a. KDE), Xfce and LXDE represent mainstream desktop environments that should be familiar to any user coming from either Windows or Mac environments. The above ordering roughly corresponds to the amount of eye-candy they offer (and to the hardware requirements they need).
Openbox and i3 are special environments as they do not contain the traditional task bar with a list of windows and they require a bit more patience before they are mastered. On the other hand, the time investment, especially for i3 that is driven by keyboard only, pays back in a much more efficient usage of your computer.
We encourage you to try all of them. Login into the environment, determine how applications are launched and decide which environment you like the most. Note that the environments can be further customized – from the overall color scheme to keyboard shortcuts.
If you are unable to decide, Plasma is a good choice for ex-Windows users with decent hardware. Choose LXDE if your machine is shorter winded. And after a month of using these, switch to i3 to become a true power user.
Selecting your applications ⚓
Once you decide on your desktop environment, look around for other applications you will need.
Above all, look around for the text editors available. There are several popular graphical editors already installed as you can see on the following screenshot (some are also available under Accessories).

Note that other editors are available from the command-line: we will talk about these during the next lab.
Source code versioning essentials ⚓
We will now switch to a side track and talk about software projects in general.
You probably heard all this on your Programming 101 course: feel free to skim through the text if you already know all of this.
Modern software is rarely a product of one-man teams. Rather, it is developed by large teams that can span several time zones or even continents.
Development in such teams requires that all developers have access to the (most up-to-date version of the) source code and that they can communicate with other members of the team efficiently.
There are many solutions to this: from e-mails and shared network disks to more sophisticated solutions. To prepare you a little for the software engineering practice, we will be using one of the more sophisticated solutions and that is GitLab.
GitLab offers a place where developers can share the source code, but also manage a list of existing bugs, keep documentation, and even automatically test their code. And since it can be integrated with other tools as well, for many companies as well as open source projects, GitLab became the central place for their product.
Furthermore, we can use its advantages even when working alone. Even if we would use it only as a smart backup for our source code at the beginning.
For this course, GitLab will also become the central place for many tasks. You will submit solutions to it and there is also the Forum project where you can ask questions.
We will add all students to the Forum during the first week of the semester.
There are other alternatives to GitLab offering similar features. We will be focusing on GitLab in this course, but the general principles apply to other tools, too.
Source code versioning tools ⚓
The central point of any software project is the source code. Without it, there is nothing to be executed. Therefore, extra care and tooling is provided for source code management itself.
GitLab itself is built around Git. Git is a versioning system. In layman terms, it means that it watches your files for changes and remembers previous versions of your files. It has the big advantage that you can freely update your code and still return to its older versions.
We will be working with Git through the whole course. Take this description as a very high-level overview so you can start working with Git the GUI-way in GitLab.
Practically, Git always works in a certain directory that typically represents one project. The user needs to tell Git which files are to be tracked and at which point to create a new version.
Git does not create the versions automatically as each version is supposed to capture a reasonable state of the project. Thus, for example, you create a new version (sometimes also called revision) once you add a new feature to your software. Or when you fix a bug. Or when you fix a typo in the documentation. Or even when you want to backup your work before going to lunch :-).
It allows you to create a reasonable history of the software that is small enough for reviewing (for example), but it does not preserve every small typo you made. Versioning does not replace undo/redo of your editor, it operates one level above that.
And when employed in a team, Git can be used to synchronize changes done
by multiple users.
For example, if Alice makes a change to file alpha.txt and Bob at the same
time changes the file bravo.txt, Git allows Carol to work seamlessly on
a version that contains changes both from Alice and Bob.
At this moment we will be using only the graphical interface provided by GitLab in the web browser. Later in the course we will uncover even the more advanced scenarios.
Using MFF GitLab ⚓
For this course, we will be using the faculty instance of GitLab at https://gitlab.mff.cuni.cz. Please, do not confuse it with the instance at gitlab.com that you can freely use, but which is in no way connected with this course.
For login (username) you will be using your CAS credentials, i.e., the same ones as you use for SIS. Your first login will activate your account.
Always use your name-based login (e.g. johndoe) not the numerical one.
Please activate your account now, if you have not yet done so. Please, read our Q & A if you have trouble logging in.
First steps inside GitLab ⚓
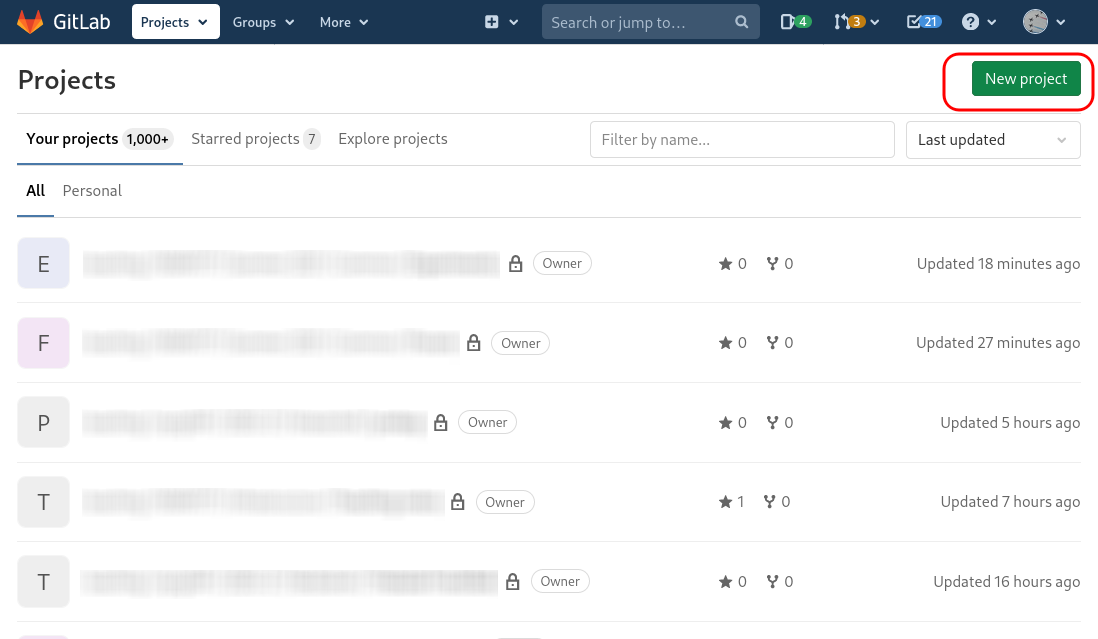
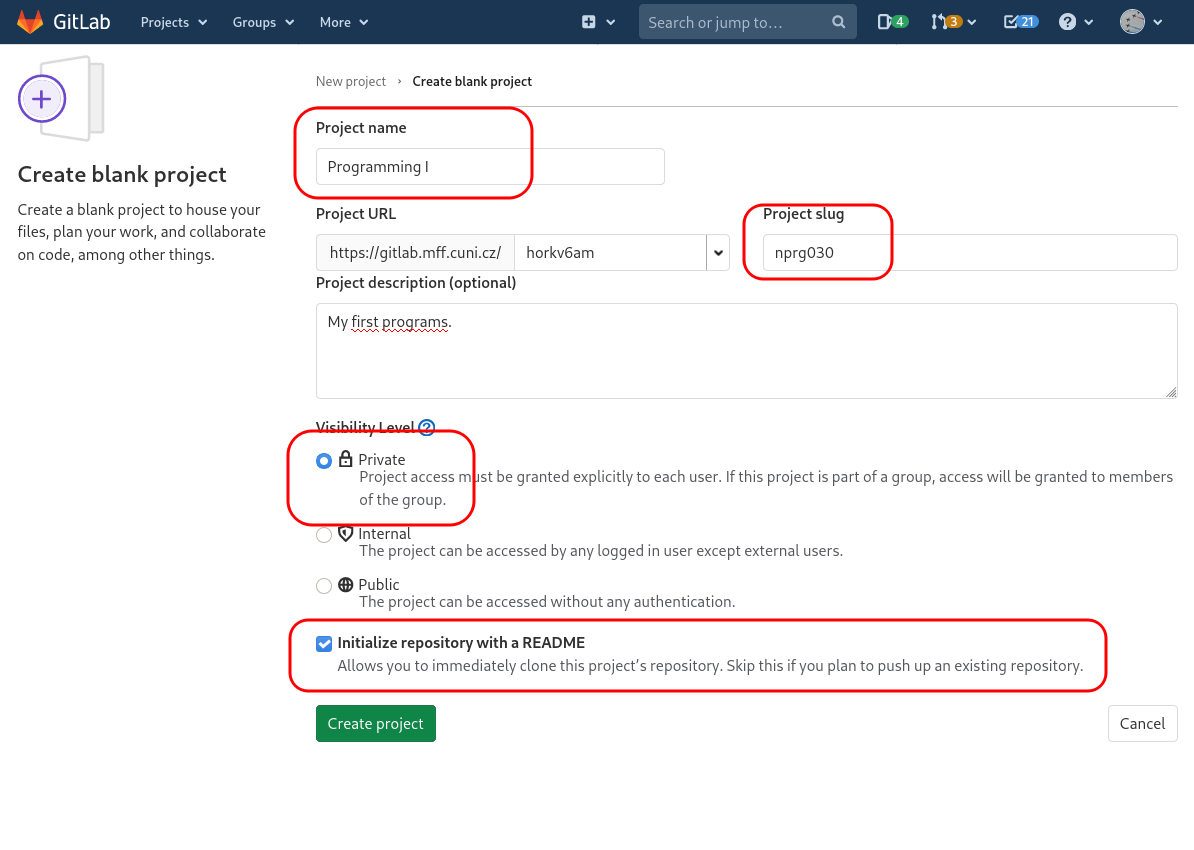
To quickly try GitLab (we will focus on it more in several labs), create a new project (create a Blank project). You need to fill in a project name, its slug (a short version of the name used in the URL), and its visibility.
In the example screenshots below, we create a project with our source code from the introductory programming course. Do not forget to ensure that the project is initialized with a README.
![]()
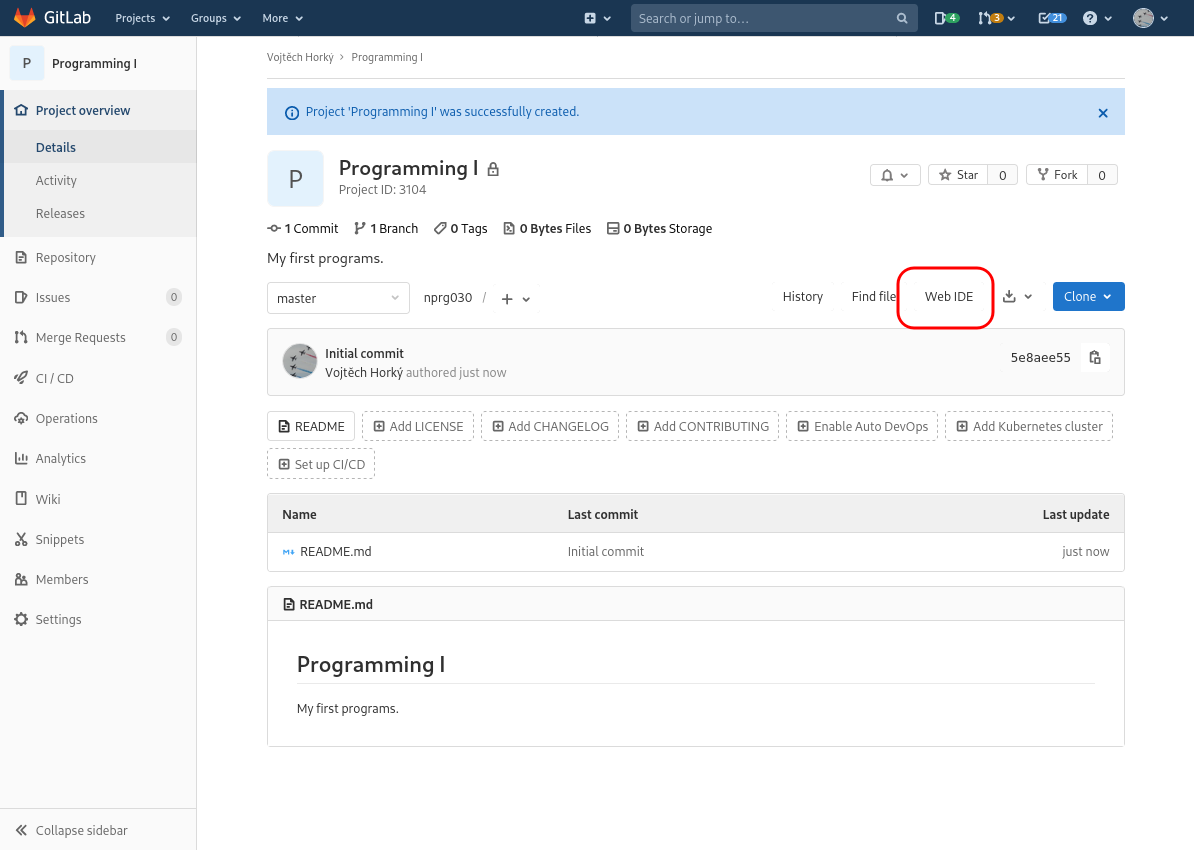
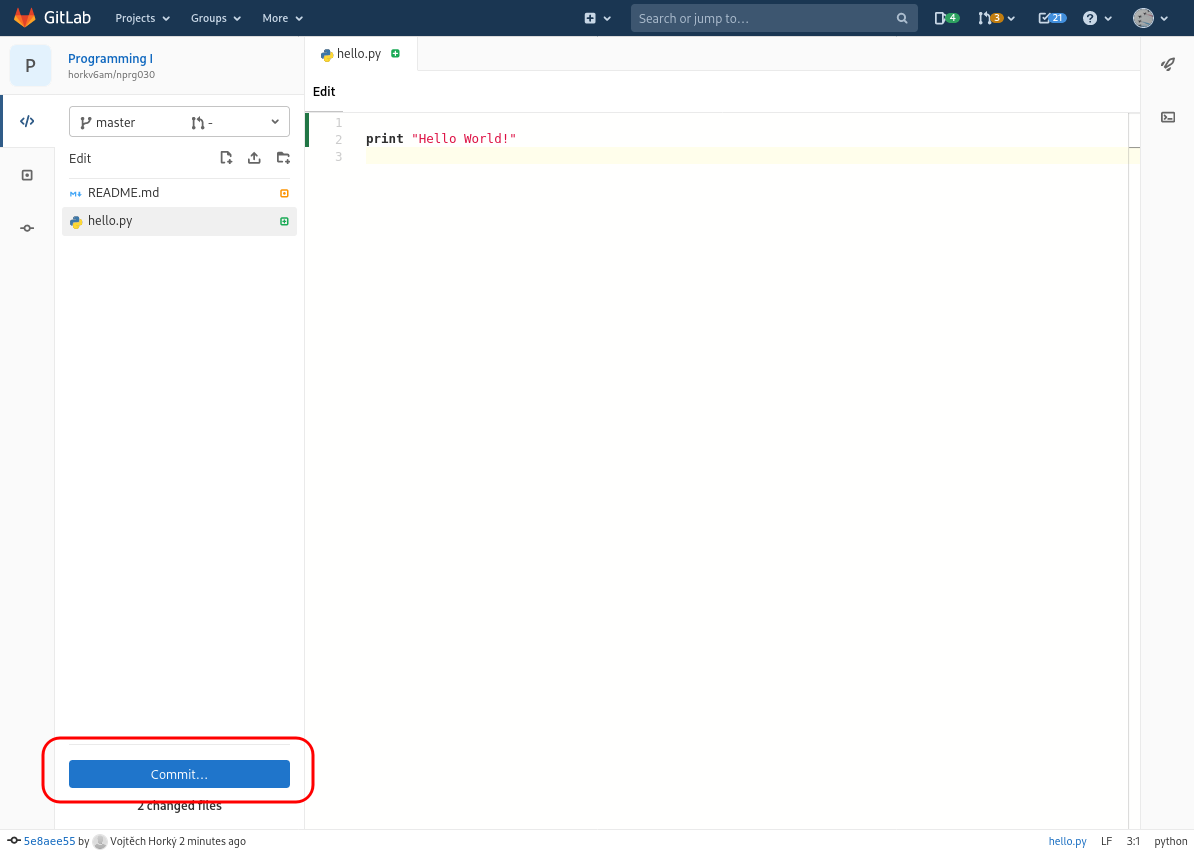
Now open Web IDE which is a simple editor available for on-line editing of the source code files.
Using the icons and the help of the following set of screenshots, create a new file,
name it hello.py and insert a simple Python program.
We will now create a so-called commit. Commit in Git captures the current state of the project and can be seen as a named version. In fact, whenever you create a commit, Git will ask you for a Commit message where you are supposed to describe what changes you made.
For now, we will be making all changes directly to the Master branch. We will explain the concepts of branches later on, for now take them as a magic that works :-).

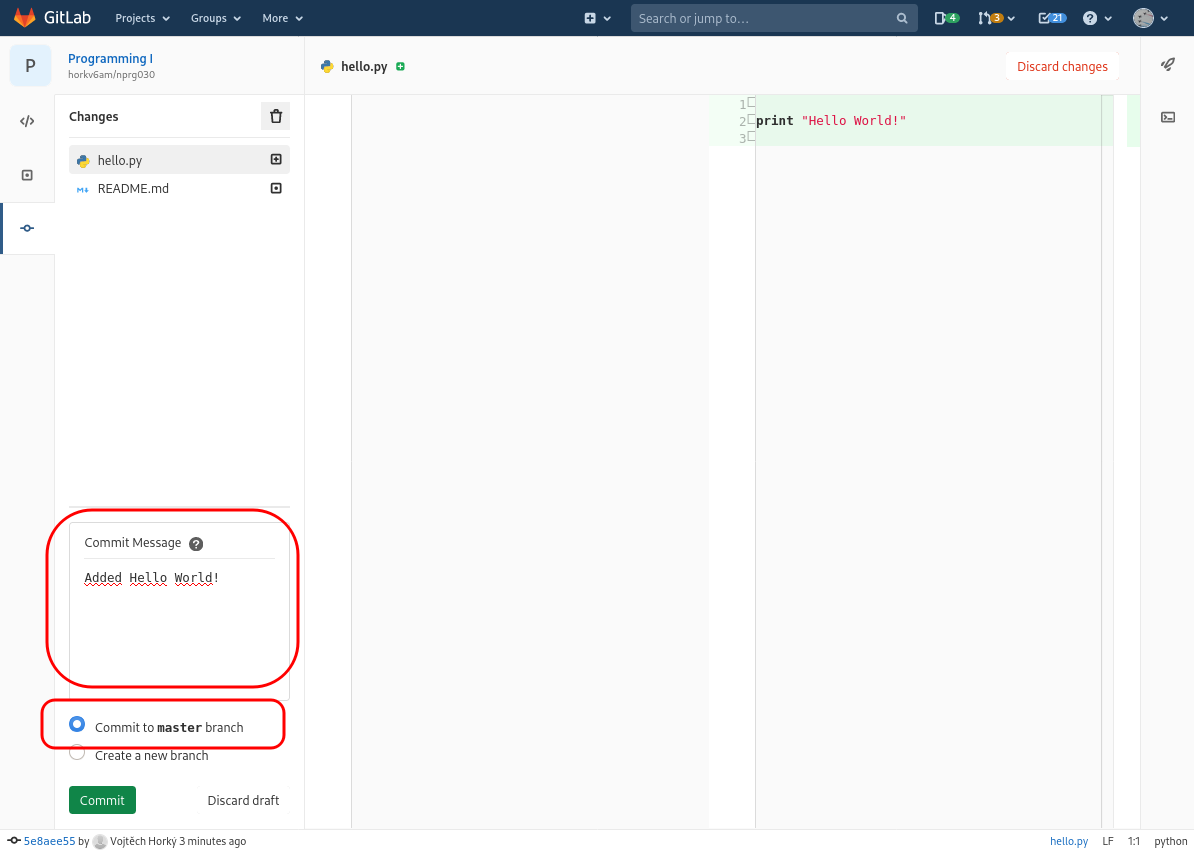
The important thing to remember is that commit assigns a name to a particular state of your source code (revision).
Often you will see names such as Add icons to the menu or Fix button typo or Finish Czech translation. As you see, they refer to the state of the project.
Sign-out from GitLab now.
Self-test: check you understood GitLab essentials
Select all true statements.
You need to have enabled JavaScript for the quiz to work.Submitting assignments ⚓
We will be using GitLab to submit your self-evaluation tasks as well as for some graded assignments.
We will create a special project for each of you here with your CAS login in its name.
We will create this project during the first week of the semester.
For technical reasons, we can create the project only after you sign-in to GitLab for the first time. We create these projects semi-manually so may need to wait until another day for your project to appear.
Each task will have a prescribed filename where to submit the solution. Submitting under a different filename (or to a different folder) means we will not be able to find your solution. There are about 300 students enrolled to this course and we need to automate a lot of things: in this sense we really cannot manually look around your project to guess whether you have submitted under a different name.
Each submission – more precisely each commit – will launch automated tests on top of your repository. These tests will check whether you have submitted the solution at all and also check whether it behaves as it is supposed to.
We have put more details on how to interpret the results on a separate page.
Wrapping up ⚓
Most of the labs will contain a set of exercises to try on your own and also also will contain so-called learning outcomes. They capture the most important theoretical knowledge as well as practical skills that you should have after completing the lab.
Use them as you see fit. They can serve as a checklist that you understand a new topic or as a summary if you are already familiar with some topics.
Tasks to check your understanding ⚓
We expect you will solve the following tasks before attending the labs so that we can discuss your solutions during the lab.
Learning outcomes and after class checklist ⚓
This section offers a condensed view of fundamental concepts and skills that you should be able to explain and/or use after each lesson. They also represent the bare minimum required for understanding subsequent labs (and other courses as well).
After class checklist ⚓
The list below captures the most important actions that you should have completed by now. Not having them done will make the next lab impossible to complete or will greatly hinder your progress.
-
I have access to a machine with (real) GNU/Linux.
-
I can login to MFF GitLab.
-
I have access to my project (repository) for this course.
-
I have completed the
01/dayname.pytask. -
I have setup notifications on the Forum project.
Conceptual knowledge ⚓
Conceptual knowledge is about understanding the meaning and context of given terms and putting them into context. Therefore, you should be able to …
-
explain why graphical user interface is not a fixed part of Linux
-
list several differences between various graphical interfaces available in Linux
-
explain in broad terms what is a Linux distribution
-
explain what can be understood under the term of unix family of operating systems
-
list a few types of assets that are typically needed for software projects
-
explain in broad terms what is a versioning tool
-
explain fundamental high-level operations of versioning tools
Practical skills ⚓
Practical skills are usually about usage of given programs to solve various tasks. Therefore, you should be able to …
-
boot your own machine into Linux (either via USB, dual-boot or virtualized)
-
log in to a graphical Linux environment
-
log in to the faculty instance of GitLab
-
create a new project in GitLab
-
upload a new file to GitLab via its web user interface and create a commit from it
-
edit existing files in a GitLab project using its web interface
-
customize a selected graphical environment
-
create a basic GitLab issue in a given project