Cvičení: 1, 2, 3, 4, 5, 6, 7, 8, 9, 10, 11, 12, 13, 14.
- Čtení před cvičením
- Setup of the running example
- Issues v GitLabu
- Creating the branch in Git
-
Connecting commits with issues and
git commit --amend - Pushing a new branch
- Exercise I
- Exercise II: hot-fix
- Commit graph
- Merge requests (žádosti o začlenění)
- Merging on the command line
- Viewing list of branches and branch deletion
- Merging upstream changes
- Hodnocené úlohy (deadline: 15. května)
- Učební výstupy
Cílem tohoto cvičení je ukázat klíčovou vlastnost Gitu: větve. Je to mocný nástroj pro každodenní kódování softwaru vyvíjeného v týmu. Ale hodí si pro jednočlenné týmy.
Nezapomeňte, že Čtení před cvičením je povinné a je z něj kvíz, který musíte vyplnit před cvičením.
Čtení před cvičením
Dnešní software je málokdy tvořen jedinou osobou: je to týmová činnost a členové týmu potřebuje spolupracovat na vývoji. Na tomto cvičení si ukážeme, co Git nabízí v tomto směru pro týmy v podstatě libovolné velikosti. Také se podíváme, jak je GitLab propojený s Gitem a jaké nástroje nabízí pro manažerskou část práce.
Obvykle týmová práce na sdíleném kódu znamená, že potřebujete, aby:
- práce každého člena týmu byla oddělená,
- ale bylo možné jednoduše výsledky jednotlivých členů kombinovat (alespoň v okamžiku, kdy jsou části skutečně nezávislé)
Tyto vlastnosti Git nabízí pomocí větví (branches). Ve skutečnosti je koncept větví mnohem silnější a hodí se i pro projekty s jedním vývojářem. V tomto cvičení se podíváme jak se používají.
Než začneme …
Mnoho věcí, které zde zmíníme už znáte z předchozích cvičení. To je v pořádku a je to naschvál: teď se je pokusíme představit najednou jako ucelený obrázek toho, co Git umí a jak se s ním pravděpodobně setkáte ve svých budoucích zaměstnání.
Pokud už větve z Gitu znáte, asi si všimnete, že spousty věcí zjednodušujeme. Formálně jsou větve ukazatele na uzly acyklického grafu comittů atd., ale to skutečně není podstatné pro pochopení tohoto textu (a do detailů se tím zabývá NSWI154).
Až budete procházet příklady, vždy je provádějte v daném pořadí neboť jinak přestanou věci dávat smysl a neuvidíte to, co bychom chtěli, abyste viděli.
Větve v Gitu
Git má koncept větví, které reprezentují řadu commitů. Zatím byla tato řada lineární – každý commit (kromě úplně prvního a posledního, pochopitelně) měl jeden předchozí a jeden následující commit. Jejich pořadí bylo určeno tím, jak commity vznikaly v čase.
Větve v Gitu vám umožní tuto linearitu rozbít – commit může mít více následníků: práce se rozdělí a každá větev má svou vlastní cestu: do programu přidáváme nové funkce. Commit také může mít dva rodiče: provádíme tzv. merge dvou větví (slití, spojení).
Typický příklad je práce v týmu. Alice a Bob pracují oba na stejném projektu a sdílí jeden repozitář. Alice pracuje na funkci A, Bob na funkci B. Oba začali na stejném commitu (řekněme hned po vydání poslední verze), ale jejich práce se rozchází: každý přidává funkce pro svůj úkol, na kterém pracují. Jakmile jsou se svojí prací spokojeni, provedou tzv. merge – tj. spojí svoje verze dohromady a získají tak verzi, které obsahuje funkce A i B.
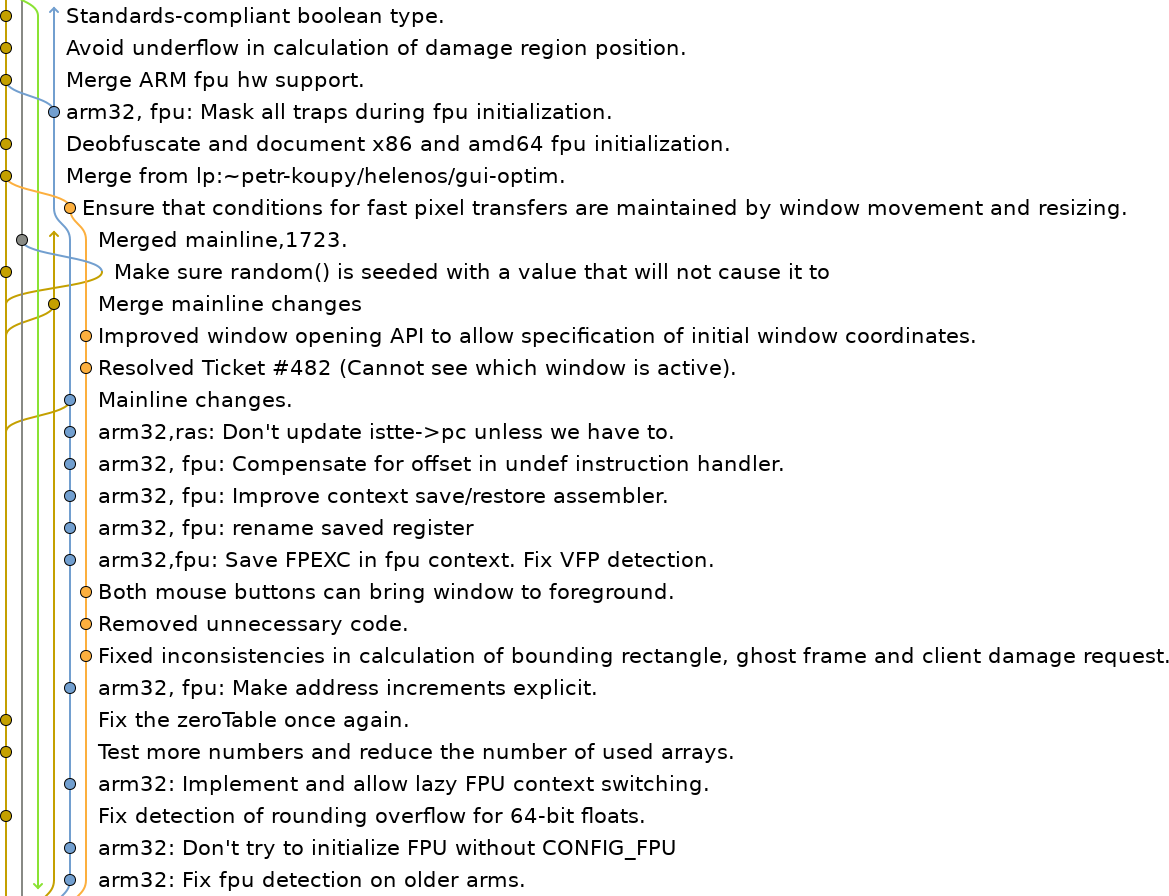
Následující obrázek ukazuje příklad jednoduchý větví (v MSIMu), ale i komplikovanější situaci ve středně velkém open-source projektu (HelenOS).

Ve skutečnosti jste už s Gitovými větvemi pracovali, aniž byste o tom
věděli.
Když uděláte clone repozitáře, vytvoříte přesnou kopii stavu na serveru.
Když jste přidali nové commity lokálně, objevili se vlastně na větvi, které
je odlišná
od větve na serveru.
Pak push tyto větve zase spojil.
A pull pracuje v opačném směru: přitáhne nové commity ze serveru a připojí
je k vaší místní větvi.
Ale zatím tyto větve nikdy nedivergovaly – jedna větev byla vždy prefixem
té druhé. Takže spojování nevyžadovalo žádnou
extra činnost a bylo pro vás transparentní.
Commit zprávy (už zase)
Přečtěte si článek How to Write a Git Commit Message od Chrise Beams pokud jste ho ještě nečetli. A pokud jste ho už četli, klidně si ho přečtěte znovu.
Máme teď už za sebou fázi, kdy Git byl nepřítel a můžeme tedy pracovat na zlepšení našich návyků.
Od teď začněte psát rozumné commit zprávy. Jsou součástí vývoje a jsou téměř tak důležité jako kód, na který odkazují. Hlavně ve velkých týmech.
Začneme odečítat body za zprávy jako “Nahran novy soubor” nebo podobné nesmysly, které nic neříkají. Pojďme začít praktikovat dobré návyky co nejdřív.
Pokud máte problém pojmenovat commit, asi se v něm děje moc věcí najednou. Je to stejné jako s funkcemi (ano, už zase!): pokud je nedokážete popsat jednou větou, něco je špatně.
Issues v GitLabu
Abychom si udrželi přehled o nevyřešených problém v našich projektech, je dobré je zaznamenávat. V postranní liště každého Gitlabového projektu je odkaz na Issues: pokud na něj kliknete, uvidíte, že The Issue Tracker is the place to add things that need to be improved or solved in a project. To je to, co potřebujeme ;-).
Každá issue má nadpis – něco jako předmět v e-mailu –, který by měl shrnout co je špatně nebo co se musí udělat. Také musíte dodat popis – v některých případech si můžete myslet, že nadpis Chyba při prázdném vstupu úplně stačí. Nestačí! Vždy přidejte příklad a postup, jak problém zreprodukovat.
Mnohé projekty mají dokonce šablony, aby uživatele navedly, které všechny informace jsou potřeba.
Všimněte si odkazu Markdown, které obsahuje nápovědu pro formátování
pomocí Markdownu: znalost ` a
``` je prostě nutnost pro každého programátora :-).
Pro další čtení si do vyhledávače zadejte jak napsat dobrý bugreport (how to write a good bug report) a alespoň jeden článek si přečtěte. Stojí to za to. Doopravdy.
Feature branches (větve pro nové funkce)
Aby se kód udržel v rozumném stavu, mnoho projektů má jednoduché pravidlo:
commitujte co nejčastěji, ale kód v hlavní větvi (tohle jméno můžete změnit,
ale obvykle se potkáte s názvy jako master nebo main) musí být vždy v
pořádku (ve smyslu, že všechny testy prochází).
Pokud pracujete na nové funkci, vytvořte si novou větev.
Pracujte v této větvi a spojte ji s masterem jen, když bude funkce hotová.
Pro některé projekty je povinnou částí před vlastním mergem recenze kódu
(code review) nebo dokonce zátěžové testy (load testing).
Má to skvělou výhodu: když někdo začne novou větev, můžete si být celkem jistý, že začíná s funkčním kódem.
Podle projektu se můžete setkat i s větvemi jako development, kde
mergování nevyžaduje code review nebo větví production, které označuje
kód, který bude distribuován (často automaticky) zákazníkům.
Doporučujeme přečíst A Simple Git Branch Workflow (dev.to) pokud chcete vědět více detailů, jak tento přístup funguje.
Bude se tím ale řídit i v tomto cvičení. Pro každou novou funkci (nebo opravu chyby) budeme mít novou větev a do hlavní větve ji zamergujeme až po otestování.
Merge requests (žádosti o začlenění)
Žádosti o začlenění (merge requests) jsou pokročilou vychytávkou GitLabu
pro větší týmy.
Ve velkých týmech je code review vyžadován vždy, než je nějaký kód odeslán
do větve master.
Code review obvykle znamená, že zkušený vývojář si prohlédne váš kód, okomentuje ho a může po vás chtít další úpravy. Představte si pod tím přejmenování funkcí, použití jiných datových struktur nebo opravy dokumentace. Cokoliv od skutečných funkčních chyb po zavedené konvence daného projektu.
Merge requesty se hodí přesně na tohle. Než dojde k vlastnímu začlenění (tj. než vaše změny odejdou do hlavní vývojové větve), můžete otevřít tzv. žádost (merge request).
Merge request se hodně podobá issue: ve skutečnosti jsou oba formuláře velmi podobné. To je proto, že Issues popisují známý problém (nebo žádost o novou funkci), zatímco merge requesty popisují, jak byl problém vyřešen. Jak říká GitLab, merge requests are a place to propose changes you’ve made to a project and discuss those changes with others.
Je dobrým zvykem zmínit, které issue daný merge request uzavře (nebo se kterými souvisí).
Opět, lze použít Markdown formátování.
Ve velkých týmech budou ostatní vývojáři komentovat váš kód právě během merge requestu a také budou spuštěny automatické testy nad vaším kódem (což se naučíte v některým z dalších cvičení).
Merge requesty mohou dávat smysl i pro osobní projekty: umožní vývojáři rychle zkontrolovat, že je vše v pořádku (třeba, že byly commitnuty všechny soubory apod.).
Začleňování změn z upstreamu (udržování vaší větve aktuální)
Feature branch vám umožní pracovat na nové funkci bez zásahů do hlavní větve. Ale práce v hlavní větvi dál pokračuje a vy potřebujete udržet vaší novou větev aktuální.
To je velmi obvyklá úloha.
Nechcete přijít o důležité aktualizace, které se dějí v masteru.
Často může přeskočení takových aktualizací výrazně zkomplikovat mergování
zpátky.
Podle velikosti a aktivity projektu může dávat smysl mergovat změny z hlavní
větve každý týden nebo dokonce každý den.
Udržování vaší větve aktuální se obvykle označuje jako mergování z upsreamu, protože se tím odkazuje na rodičovský projekt (větev).
Uvidíte, že se to vlastně vůbec neliší od jiného mergování. Je to jen o určení správného směru (tj. změny do hlavní větve nebo změny v hlavní větve do vaší feature větve).
Git vám s tímto procesem vždy pomůže a často to bude zcela automatizovaná záležitost.
Kvíz před cvičením
Soubor s kvízem je ve složce 12 v tomto GitLabím
projektu.
Zkopírujte si správnou jazykovou mutaci do vašeho projektu jako 12/before.md (tj. budete muset soubor přejmenovat).
Otázky i prostor pro odpovědi jsou v souboru, odpovědi vyplňte mezi značky
**[A1]** a **[/A1]**.
Pipeline before-12 na GitLabu zkontroluje, že jste odevzdali odpovědi ve
správném formátu. Ze zřejmých důvodů nemůže zkontrolovat skutečnou
správnost.
Odevzdejte kvízy před začátkem cvičení 12.
Setup of the running example
Ensure that you do not skip any step in the examples below as otherwise some of things would stop making sense and you would not see the effects we want you to see.
Create a fork of the teaching/nswi177/2022/common/csv-calc repository.
Throughout the lab we will work on the example in this repository. Do not forget to clone your fork (not the original repository). You will be making quite a lot of changes there.
This example will try to emulate work in a team – whenever we talk about a different feature (or a bug), imagine that you are working in a big team and the features/bugs are not single-line fixes, but multi-day effort of individual team members.
Look at the csv_calc.sh script and run it as described in the README
file. Also read how the script works (that is in there too).
Issues v GitLabu
Notice that the script prints an error message when the expression
is invalid.
For example, for ./csv_calc.sh 'sum=t01+' <example.csv.
However, exit code is always 0, denoting success.
This is bad practice, let us fix it.
However, people seldom have time to fix a problem at the moment when they discover it. It is therefore quite useful to keep track of all unresolved issues in a project, so that they will not be forgotten.
Open the home page of your fork in the browser. Create a new issue describing the problem. Explain the problem precisely, do not forget to set proper title.
Bugs seldom go alone. There are more issues with the code. Let’s create an
empty file precious.txt in our directory and run
./csv_calc.sh 'sum=t01 )); rm -f precious.txt; : $(( 0 + 2' <example.csv
Oops, the file is gone. We managed to inject malicious code into the expression. If it were a real-world project, this would be a serious security problem.
Therefore, create another issue for this in your project. Again: use a descriptive title, provide a meaningful description. Really. Use this as a practice for the graded task.
View the list of your issues. Each issue should have a number next to it that we can reference later on.
Creating the branch in Git
We will follow the example from before-class reading in this lab. For each new feature (or a bug fix), we will start a new branch and merge it to the main one only after we have tested it.
We will start by fixing the bug with the exit code. Let’s create a branch for that and switch to that branch.
Bigger teams often have conventions for branch naming. Let us keep things
simple and use issue/N for branches that are supposed to fix an issue
with number N.
To create the branch, we will use git branch command.
git branch issue/1
This command does not do anything visible. It only marks the current (last) commit as the starting point for a new branch.
To actually switch to a new branch, we need to execute
git checkout issue/1
Right now, the switch has no visible effect - both master and issue/1 branches refer to the same state of files.
Now, write a fix for this issue. Hint. Solution.
Commit the change.
Connecting commits with issues and git commit --amend
Git is quite flexible when working with commits. If you realize that you
want to change the last commit, you can git add files and then call git commit --amend. It will open your text editor with the commit message
already filled-in so you can change it.
Warning: never --amend a commit that you have already pushed
to the server. That commit could be already cloned by someone else
and things would start to break (as a matter of fact, it would be
possible to fix things because the commits would basically behave
as branches but it is probably not something you want to do).
Also, if you have changed an already-pushed commit, you would need
to do a forced push to overwrite the commit on the server.
For many projects that is not possible on the master branch at all.
So, preferably avoid amending pushed commits.
Use this feature and add to your last commit fixes #1. This will have two
effects once you push this commit to GitLab. First of all, the issue will
contain a link to the commit and the #1 in the commit message will become
clickable to open the mentioned issue.
Because our commit fixed the issue, we have added the special keyword
fixes to the commit message to automatically close the issue
(there are plenty
of issue closing patterns
out there).
The issue will be closed once the commit is merged to the master
branch. That makes a lot of sense: the issue might be fixed but until
the code is in the master branch, the program still contains the bug
(recall that usually master branch is the code that is shipped to the
customer).
Note that it serves too purposes – it saves time (we do not have to switch to the browser at all) and it provides a valuable reference to which commit was actually responsible for fixing the bug. Note that the issue on GitLab is not yet marked as fixed, as we didn’t push any commits to the GitLab yet.
You should not have any uncommitted changes in your project. Let’s switch
back to the master branch. Check that the script (after the switch) does
not contain your fix.
Note that if you have your script opened in a text editor, it should warn you about file being changed on disk. If not, reload the file manually. Hint.
Technically, git commit --amend creates a new commit in place of the
original one. That has several subtle implications, the most important is
that the histories before and after the amending are different ones from
Git’s perspective. This means that if you have already pushed the original
commit, you should not amend it, because it will be difficult to push the
new commit (because it doesn’t extend the history on the server).
Pushing a new branch
Switch back to the issue/1 branch and push it to GitLab. If you run git push (as you were used to), Git will complain that the current branch has
no upstream branch. It means (more or less) that you are pushing this
branch for the first time and Git wants to make sure how to name the branch
at the server.
Nice thing is that Git offers you the command to run to ensure the branch is pushed.
For now, ignore the link that GitLab sent you back.
Solution.Open your project in the browser again. Check that your issue now contains a link to the commit that mentioned it and on the homepage of the project, you can select which branch to display.
Exercise I
Second issue
Let’s now fix the second issue (the code-injection one). Create a new branch, resolve the issue and commit the fix.
Do not push the branch yet.
Some questions and thoughts:
- Why do you need to switch to master first? How would the branching look
like if you branch from
issue/1? Why is that bad? - To actually fix the issue, consider using the
printfcommand which works similarly toprintfyou may know from other languages (or to.formatfrom Python). The%qdirective is the one you are looking for. - Do not forget to include
closes #2(or similar) in the commit message.
Exercise II: hot-fix
Let’s assume that you just now noticed the typos in README.md (form is
not from and there are two typos).
We want to fix that right away and we will do it (just this one time) directly in master branch. This is often called hot-fix: something you need to fix ASAP and where breaking the usual habit of feature branch, code review, testing etc. is a hinderance instead of help.
So, switch to the master branch (you already committed the fix to issue #2, right?), fix the typos and commit it.
Push your changes from the master branch.
Commit graph
Open the Repository -> Graph page in your browser (from your project). It should show you your branches graphically.
You should see a new branch, issue/1 next to master that stem from the
same commit.
The graphical view is a good help if you get lost in a complicated branching model and you are not sure whether some changes should be visible or not in a specific branch.
The purpose is not to create a complicated graphs though sometimes it can be quite wild.
You can also use --graph parameter for git log to have a graphical
representation in the terminal.
Merge requests (žádosti o začlenění)
Switch to the branch for the second issue and push it to GitLab, too. You
will need to use the --set-upstream switch again.
Notice that after the push, you ought to see a text informing you about opening a merge request with a link.
Open that link in your browser now.
You will notice that the merge request is not submitted yet. The title and description are pre-filled and they look similar to the form we have seen with issues.
Create the merge request now.
WARNING: Double-check the destination of the merge request. It has to be a branch in your repository, not the repository you forked from.
Let’s merge the request now (there is a big button for that).
Keep the default and do a merge (i.e., not a rebase nor a squash).
The merge request being closed, we should see a new commit in the master branch.
You may also look at the repository graph again to see how the commits look after the merge.
Check issues of your project now and note that the second issue should have been closed now. You can also check the details of the issue and notice how the commit is nicely connected to the issue.
Back in your local clone of the repository: do not forget to pull the latest changes from master (GitLab created the commit on the server only). Hint.
Merging on the command line
We will now merge the first issue directly on command line without opening a merge request. Because the merge request is always bound to some kind of a branch, you can always merge on the command line, too. Note again the dual approach which is omnipresent in Linux: you can use nice graphical UI, but also a fully automatable command-line interface.
First, we need to ensure that we are on the branch we want to merge into. Usually, that would be the master branch.
The actual merge is quite simple, indeed.
git merge issue/1
And it is done. Push the master branch again and check the repository graph
now. Note that the merge is actually just a commit that has two different
commits as parents (previous commits). Indeed, the most of the options are
similar in both subcommands.
Viewing list of branches and branch deletion
To view list of branches, we can simply call the following command.
git branch
Sometimes it is useful to view all branches including those on the remotes
(see later on) by adding -a.
Once the branch is merged, we can remove it to keep the list clean.
git branch -d issue/1
Deleting a branch does not delete its commits when it was merged.
Instead, removing the branch simply removes the label that stated that
particular commits belonged to a particular branch.
That is why Git will not ask for confirmation with -d because you are not
discarding any actual code or any commits.
However, if the branch is not yet merged, Git will refuse to delete the
it (with an error message stating that the branch is not fully merged
and a hint to use capital -D if you really wish to delete it).
Merging upstream changes
Next, we will simulate that work in the upstream repository (i.e., the one you forked from) continues and you want to keep your repository (your fork) up-to-date.
With Git, all this is possible and (maybe surprisingly) there is very little difference whether you merge your own (local) branch or changes of someone else working in a completely different fork.
To merge changes from a different repository than the default one (e.g., a different project on GitLab), we need to set-up so called remotes.
A remote is a Git name for saying that your local clone also knows about other forks and it can tell you whether there are differences. Again, this is an overly simplified way of looking at things, but is sufficient for the how-do-you-do of Git remotes. Usually you expect that the remotes share a common ancestor, i.e. the initial commits are the same across remotes.
To see your remotes, run (inside your local clone of your fork of the examples repository)
git remote
It would probably print only origin. That is the default remote: when you
do git pull or git push, it uses origin. Thus, you were using
remotes even without knowing about it ;-).
Running it with -v (for verbose) will print what are the specific URLs
where the remote is located. As a matter of fact, you will probably see two
remotes now: one for push, one for fetch (pull). You can even configure Git
to pull from a different repository than you are pushing too. Not very
useful for us at the moment, though.
To see even more details, try git remote show origin.
Adding another remote
Let us add a new remote to our repository. This will refer to a different project, so that we can compare our changes with theirs (again, a simplified view of things).
git remote add upstream git@gitlab.mff.cuni.cz:teaching/nswi177/2022/common/csv-calc.git
The above command added a remote named upstream that points to the given
address (i.e., the original project). Note that Git is silent in this case.
Run git remote again. How it changed?
Working with remotes
By adding the remote, no data were exchanged yet. You have to tell Git to do everything, nothing happens automagically. Note that if you ever encounter a different versioning system, Git will feel very low-level and perhaps even tedious to use. It is the price for its effectiveness and flexibility.
Let’s fetch the changes from our new remote now.
git fetch upstream
You should see the typical summary as when cloning/pulling changes in Git. This time it referred to data from the upstream repository.
However, in your working tree (i.e., the directory with your project), nothing changed. That is fine, we only asked to fetch the changes, not to apply them.
However, run git branch and git branch --all to see which branches you
have access to now.
Note that adding a remote does not start any communication with the remote
server, Git only writes down the configuration. git fetch than actually
retrieves the changes from the remote server. Without git fetch, we would
have no information about the actualy code available on that particular
remote.
Comparing branches (and merging them too)
Now, we will investigate how the newly added remote differs.
Let’s start with showing commits on the remote:
git log remotes/upstream/tests
As you can see, git log can show commits on a certain branch only (yes,
the remote/... is actually a branch name: after all, you have seen it in
git branch --all). And it also works on files (e.g. git log -- README.md). It is quite powerful command indeed.
But we wanted to see how the code differs. That is actually even more important: you want to see which changes to the code were made and whether it would be possible to merge them at all.
git diff remotes/upstream/tests
You ought to see a patch that displays that the newly added remote differs in one file only: automated tests were added.
They look pretty good – we want them in our project, too.
Let’s merge the remote branch, then:
git merge remotes/upstream/tests
Since there shall be no conflicts (i.e., both branches – master and
remotes/upstream/tests – changed different files), the merge should be
automatically completed.
Check your project directory: is the tests.bats file there?
Note that you can change the merge commit message using --amend.
Resolving conflicts
Using the same approach, prepare for merge (i.e., do not run git merge
yet) with upstream/hotfix.
As you probably noticed, the second branch contains a typo fix. But you already fixed it (if not, fix it before merging!).
The merge will lead to so-called conflict: two developers touched the same file and made their individual modifications. We would need to resolve that manually.
That is quite common and there is no need to be afraid of it. Git is able to help you a lot – when there are changes to different parts of a file, Git is able to merge the changes without any problems. But when both branches change the same lines, it is up to you to resolve it. That is quite natural and you would be surprised how many times Git is able to merge things automatically.
Enough of theory, run the merge command now:
git merge remotes/upstream/hotfix
This merge will end with an error and Git will inform you about the conflict.
Review the output from the merge command. Note how Git tries to help you
what can be done…
Run also git status and investigate its output.
Now comes the tricky part of the whole workflow: you need to resolve the conflict. In our case, it is rather simple. For complex software, resolving a conflict can be a very tricky operation as you need to check several places and mentally combine the changes first. Having automated tests can help, but analytical thinking is certainly a plus.
Once you solve the conflict, you need to call git add (like with a normal
commit – a merge commit is still a commit, after all) to resolve the
conflict.
git add README.md
To finish the merge, run git commit as with any normal commit.
Do not forget to push the changes to your repository.
How would the graphical representation of the commits in GitLab look like now?
Try to sketch it on a paper before opening the Graphs page in GitLab.
Hodnocené úlohy (deadline: 15. května)
Hodnocené úlohy pro toto cvičení jsou trochu jiné než obvykle, protože potřebujeme otestovat vaše chápání systému, který se zároveň používá pro odevzdávání.
Prosím, přečtěte si pečlivě popis úlohy a řiďte se přesně pokyny. Mnoho částí nejde automaticky otestovat v rámci pipeline, protože nemají přístup k GitLabímu API a tento klíč jim není možné nějak bezpečně předat.
12/csv_calc.sh (70 bodů)
Důležité: přečtěte si nejdřív popis celé úlohy, některé detaily jsou vysvětleny později.
Zkopírujte si csv_calc.sh do vašeho repozitáře.
Očekáváme, že bude obsahovat opravu pro exit kód i opravu s`printf ‘%q’.
Issue
Vytvořte GitLabovou issue pro následující problém.
Co se stane, když znovu vytvoříte (prázdný) precious.txt a přidáte
následující řádku do vstupního CSV Mayor Humdinger,0,0,0';rm -f precious.txt;:' a spustíte znovu příkaz zmíněný v README.md?
Abychom mohli vaší issue najít, přidejte [task-malicious] to jejího názvu
(a ujistěte se, že je jediná ve vašem projektu).
Větve
Vytvořte pro issue novou větev, držte se pojmenování issue/N.
Opravte problém.
Větev pro issue [task-malicious] nemergujte, ale nahrajte ji do GitLabu.
Ujistěte se, že uvidíme větev origin/issue/XY když si stáhneme váš klon
(XY bude pochopitelně odkazovat na číslo issue [task-malicious]).
Pokud možno poslední commit ve větve [task-malicious] by měl obsahovat
zprávu, která issue automaticky uzavře.
Nemergujte [task-malicious] větev – my ji zamergujeme v rámci vyhodnocení
a zkontrolujeme, že issue doopravdy zavřela.
Testy
Testy se pokouší zjistit, na které větvi jsou spuštěny a běžet jen relevantní testy. Pokud špatně pojmenujete vaší větev nebo bude ve vašem repozitáři více podobně pojmenovaných větví, mohou se spustit špatné testy. Selský rozum by vám měl pomoci určit, jestli se spouští ty správné.
Opravování…
Pokud se vám podaří větev zamergovat i když jste neměli, neděste se. Doporučujeme větev odstranit v GitLabovém UI (pokud to jde), skript odstranit a začít od nového commitu.
Prosím, ujistěte se ale, že přejmenujete issue, aby existovala pouze jedna issue, kterou budeme moci použít.
12/UPSTREAM.md (30 bodů)
Možná jste si všimli, že repozitář s úlohami byl ve skutečnosti forkem jiného. (To bylo z technických důvodů, protože to zjednodušuje vytváření projektů.)
Ale také to znamená, že můžete mergovat změny od nás.
Rodičovský projekt teď obsahuje soubor 12/UPSTREAM.md s nezajímavým
obsahem.
Přimergujte tento soubor do vašeho repozitáře. Nedělejte rebase ani squash, udělejte, prosím, normální merge.
Soubor nekopírujte, využijte Git pro začlenění změn.
Stejně jako další podobné Gitové úlohy: testy mohou začít padat za nějakou dobu (nezapomeňte, že GitLab klonuje jen pár commitů). Takže je to v pořádku, pokud vám testy někdy předtím procházeli.
Učební výstupy
Znalosti konceptů
Znalost konceptů znamená, že rozumíte významu a kontextu daného tématu a jste schopni témata zasadit do většího rámce. Takže, jste schopni …
-
vysvětlit, co je větev v Gitu
-
vysvětlit, co je feature branch
-
vysvětlit, co je to merge (pull) request a kdy je užitečný
-
vysvětlit, co se míní tzv. upstream repozitářem (projektem)
-
vysvětlit rozdíl mezi forkem projektu a klonem repozitáře
-
vysvětlit, co je to Git remote
-
vysvětlit, co je to Git merge konflikt, kdy k němu dochází a jak se s ním může vývojář vypořádat
Praktické dovednosti
Praktické dovednosti se obvykle týkají použití daných programů pro vyřešení různých úloh. Takže, dokážete …
-
vytvořit Issue v GitLabu
-
vytvořit větev v Gitu
-
vytvořit merge request (žádost o začlenění) větve v GitLabu
-
přepínat mezi větvemi v GitLabu
-
merge (začlenění) větve v Gitu
-
řešit konflikty při mergování v Gitu
-
nastavit Git remotes